Arthur Green, Book Conservator, Conservation & Collection Care, Bodleian Libraries
Ed. note: this paper re-creates a talk and practical demonstration given during the ‘Stationery Bindings: History, Development and Treatment’ workshop, organised by the Icon B&PG Co-Operative Training Register and the Archives and Records Association, on 4 February 2013.

‘Bookbinding apprentices and journeymen, particularly those in the stationery binding trade whose experience has of necessity been limited, have long been in need of the means of obtaining additional information and a wider knowledge of the craft. The general standard of workmanship has, on this account, been allowed to fall to a very low level…’
Alex J. Vaughan
Modern Bookbinding, 1944
Introduction
In 1799 John and Joseph Williamson patented a new method of binding which later became commonly known as the ‘springback’. This style of stationery binding thrived during the last half of the 19th century and the first half of the 20th century. With the demise of the commercial stationery binding, the springback almost disappeared from the bookbinders’ curriculum, and is now a structure that few bookbinders and conservators have experience of making.
This short paper will discuss some key forwarding techniques involved in making an English springback binding. It is not intended to be a complete explanation of the forwarding processes, but more a compilation of useful information that I have discovered during my research. I hope that it will give a better understanding of the mechanical properties of springback bindings, and help avoid some of the problems that can occur.
My research into this subject was prompted by the limited information available, but also by the shortage of people who can pass on their hands-on experience. There are still many unresolved questions in my mind, but there are two particular areas of discussion that are recurring themes. One is regarding the concept of strength; springbacks are often referred to as strong functional bindings. I think that some of the traditional methods of binding may not necessarily give the added mechanical strength that they intend. The second is that of materials; I believe that an updated assessment of the materials used in stationery bindings could prove very useful. A greater understanding of materials would inform both the binding of new books, and the repair and conservation of old bindings.
Literature
As far back as 1929 Alex J. Vaughan recognised that there was little written on the subject of stationery binding, and this remains the case today. Most of the limited number of books on the subject were published in the first half of the 20th century, and can be difficult to obtain. Many of these texts are aspirational in their style; they are written in an era of modernism, and often talk about ideals and values rather than covering the specifics of the procedures necessary. I have found that the reality of how springbacks were bound at the time is not always in keeping with these manuals. Contemporary manuals are a fabulous resource, but the key is to decipher them and decide which information is useful for the modern bookbinder or conservator. The three books that I would recommend are those by Mason, Monk, and Vaughan (see Bibliography).
Problems…
Anyone who regularly works with springbacks will be familiar with some common types of damage: detached boards that have failed along the joints, slumped text-blocks and detached text-blocks, where the endpapers have split along the joints. These problems can occur for a number of reasons. Poor quality materials can affect longevity and bad forwarding, while the omission of certain elements of the binding can also have adverse effects. However, it is often the frequency of use that is the cause of damage. Springbacks can often simply wear out due to the level of handling that they are subjected to.
The springback is a wonderful invention but it is also a flawed one. It is flawed because we expect too much from it. It is ostensibly a book to be written in and works best when laid flat. The flexible spine lining enables the leaves to be ‘thrown up’, offering full access to the entire page. The oversized spine stiffener (the spring) provides the mechanics necessary for this, but also provides durable protection for the back of the book. Problems arise when we expect springbacks (often large, heavy books) to maintain their shape when stored upright as well as laid flat. The minimal spine linings eventually weaken, and the text-block no longer maintains its rounded shape. The book will then be susceptible to all of the common types of damage described above.
There are also problems that the binder, or conservator, may encounter when forwarding a springback. As with other binding styles, there are a multitude of potential problems that can occur. One problem often encountered is with the shape of the text-block after the book has been opened. The text-block can resist returning to its original rounded shape, and a start, or lump, appears at the fore-edge at the point where the book has ‘popped’ open. To tackle this particular problem, and also to help with the general forwarding of a springback, I have chosen to address three specific aspects of the forwarding of a springback binding: folding and sewing, spine linings, and the lever and spring.
Folding and sewing
Although not strictly classified as forwarding under certain definitions, the folding and sewing lay down the foundations of any binding, and can greatly affect the mechanics, and in turn the longevity, of a book.
First select your paper. The type of paper used will, of course, vary in accordance with the size and function of the book; the weight of the paper should be proportionate to the size of the book. The paper should ideally be strong, and if it is to be written on, then the paper should have enough size to give a good writing surface.
In general it is preferable to have thicker sections for a springback than one would for a letterpress binding1, and this is noticeable if one surveys a number of springbacks. It is possible that the prevalence of thicker sections was down to economics; thicker sections would reduce the amount of time spent sewing; however, I believe that the real reason is that it helps to reduce the swell of the sewing at the spine, and also gives the book the greater strength necessary. The relationship between the thickness of the paper, the number of leaves in the section and the overall size of the book are all interdependent. This relationship is important and it can be difficult to get the balance right the first time.
One of the most important elements of the whole binding is the sewing. It is essential that the book is sewn evenly, but not too tightly, especially at the kettle stitches. When the book is rounded there needs to be enough movement in the sewing to let the sections move over one another. Remember that the rounding process also adds tension to the thread, so this must be accounted for. I would recommend a thicker thread for sewing than one would perhaps use for letterpress binding, and I would always sew on a minimum of four tapes. Use a good-sized tape or webbing, and avoid braids as they can stretch. I prefer to wash and starch2 the tapes myself, to give them a little more rigidity.
Many stationery binding manuals suggest ‘taping’ for extra strength. This involves adhering a strip of cloth around the first and last few sections. I choose not to do this, as I have seen many account books where the hard edge of the tape has caused a fracture and, in some cases, the leaf has become completely detached.
Spine lining
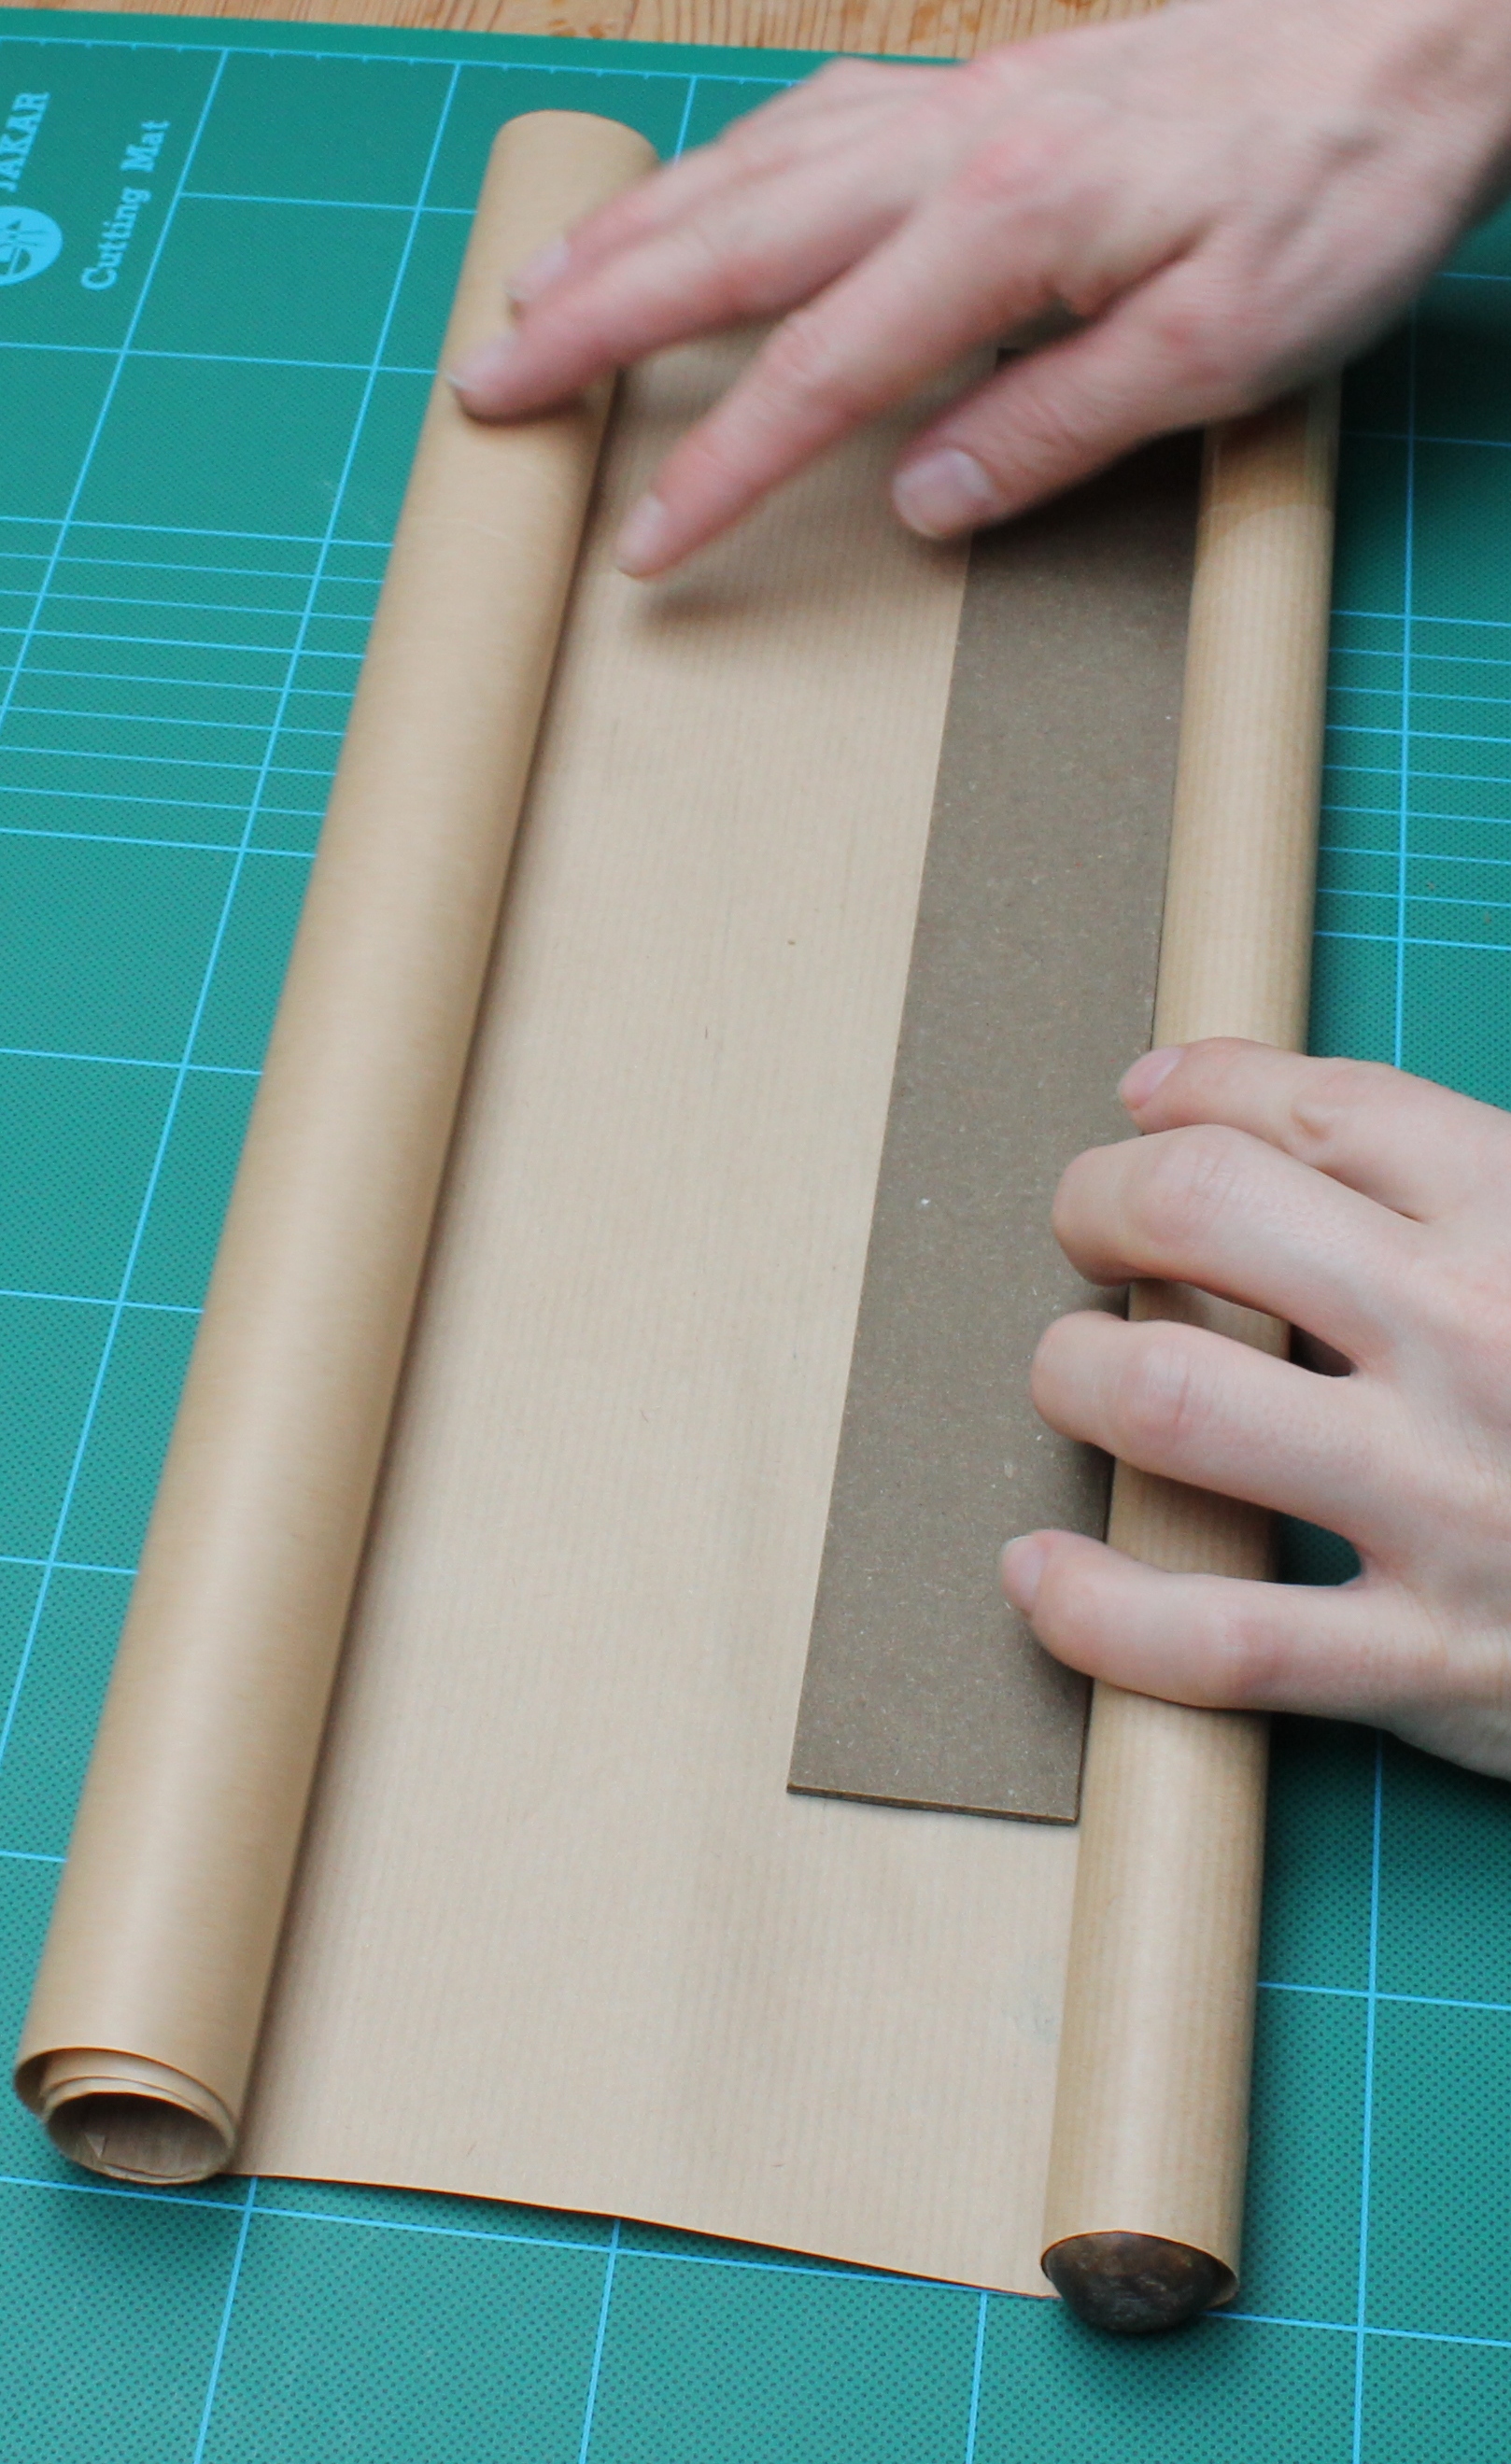
Before lining, the book should be rounded but not backed. It is important that the book has little or no swell. The spine of the book is lined between the tapes with strips of leather called clothings (pronounced ‘claw-things’). Choose a thick, archival, vegetable-tanned skin at least 1mm or more in thickness. Alum-tawed skin is an excellent alternative; the high pH of tawed skins gives them good aging qualities. The clothings should sit neatly between the tapes and extend over onto the text-block by about 1/3 of the width. The clothings at the head and tail should be cut at an angle where they extend on to the text-block, so that they are not visible at the edge of the pastedown. The clothings should be edge-pared to avoid a hard edge. The narrow clothings between the tapes should be pared on their short ends only; clothings at head and tail should be pared on their short ends as well as on their long angled edge.
The clothings are the only spine lining that the book gets, so it is important that they are well adhered to the backs of the sections. If the spine linings are not well attached then the text-block will not hold its shape, and the problems with starts or lumps on the fore-edge can occur. The leather, or tawed skin, should be wetted then pasted out at least twice and rubbed down well onto the spine. The traditional adhesive used was animal glue. Although it has its drawbacks, animal glue does have the benefit of giving the spine sufficient rigidity to hold its shape. I use a thick wheat starch paste. Wheat starch paste has known aging qualities and can give good adhesion if made to a thick consistency.3 Once the clothings are dry and firmly stuck to the spine, the loose ends can be pasted down over onto the lever.
For very large springbacks, some textbooks recommend lining the spine all along, i.e over the tapes, and then tacketing. Tacketing involves adding individual stitches (traditionally made from cat-gut) through the leather lining and around the tapes, to reinforce the sewing. Tackets are usually sewn on around the tapes in the sections at the ends of the book, as these are under most stress.
The lever
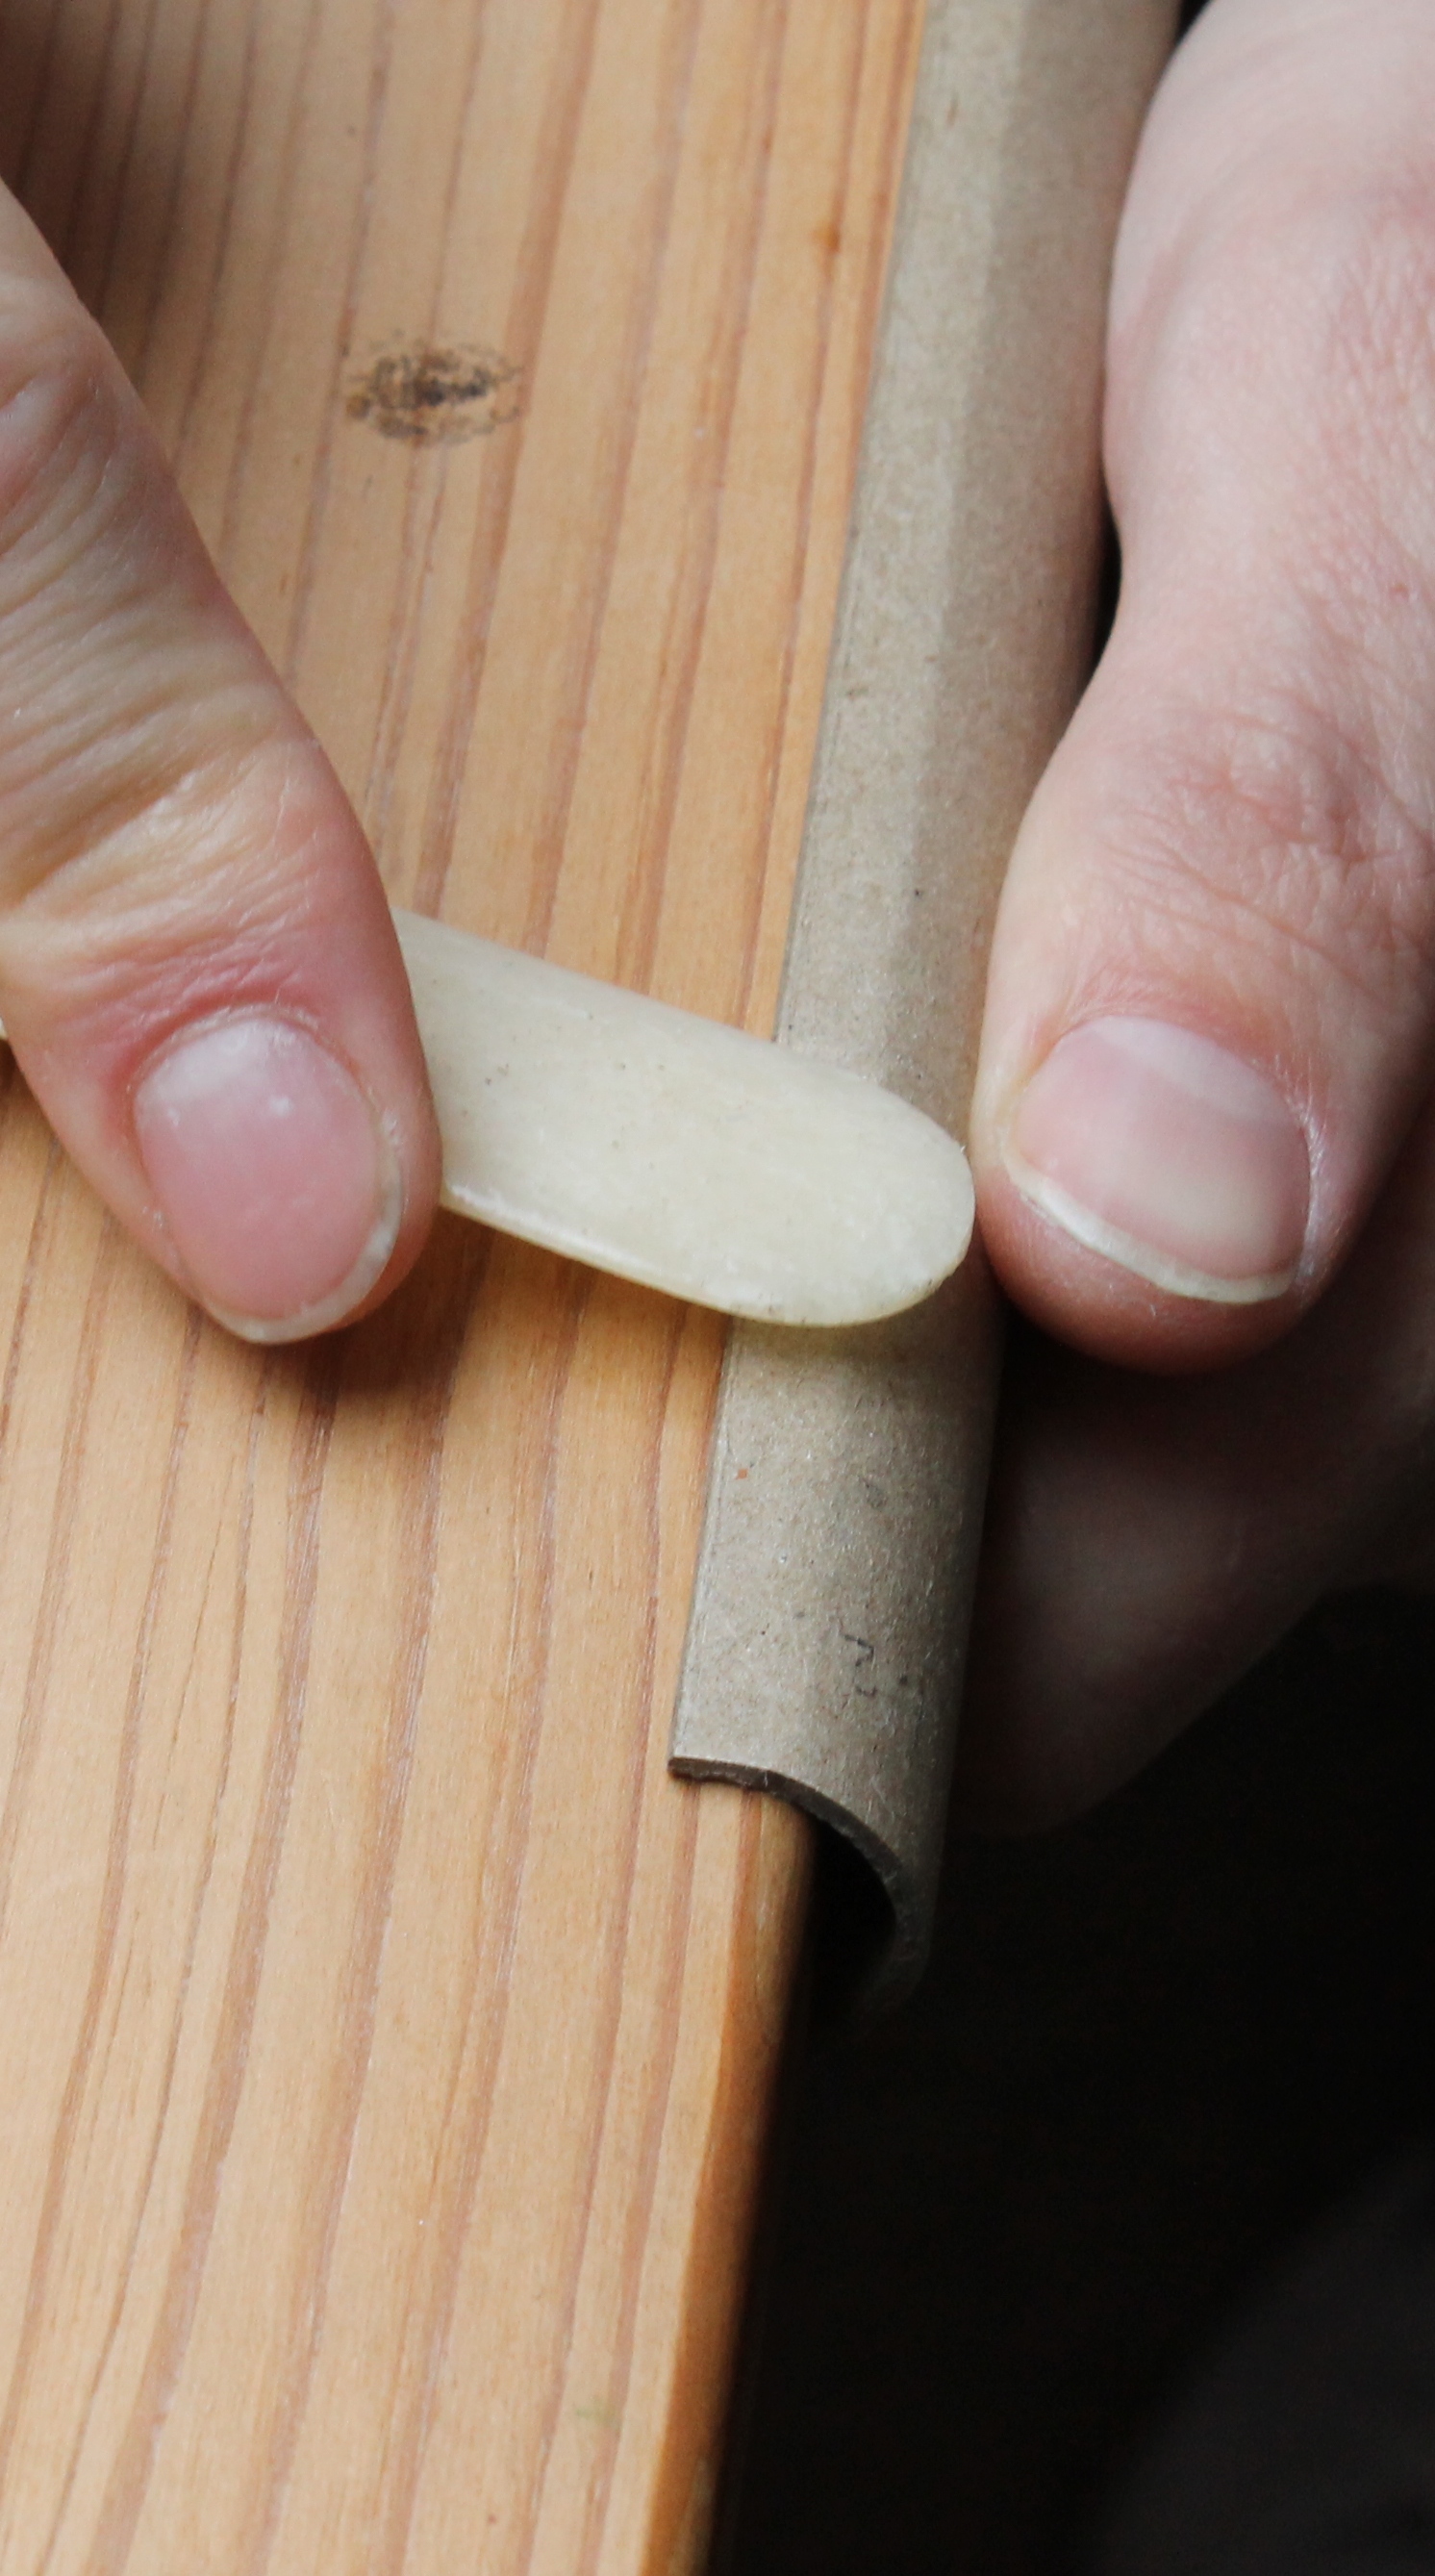
The lever works in unison with the spring, giving the boards their unique opening characteristics. The lever is made from a thin board about 1mm thick and, importantly, the grain direction should run spine to fore-edge not head to tail. The lever should be 1/3 the width of the book-block, and its height should be taken from the midway point between kettle stitch and the tapes. The lever is adhered to the waste sheet 2mm away from the edge of the spine. To reduce the hard edge of the lever, edge-pare the head, tail and fore-edge before it is attached.
To finish the lever, the waste sheet is folded back over the extended spine linings and pasted down. Rub the waste sheet down firmly over the leather and tapes. When everything is dry, tear off the excess paper up to the edge of the lever. The tabs are separated from the lever by making a cut with some strong shears either side of the lever. Widen the gap with a second cut about 3mm apart. You can now cut the tabs at an angle at the head and tail. This is so that the tabs are not visible once the endleaves are pasted down. Finally, edge-pare the leather each side of the cut to reduce the thick edges.
The spring
As the name suggests, the spring is a key part of a springback binding. The method I am about to describe is not complicated but does rely on good judgement. It is absolutely essential that the spring is a good fit on the book. A slight error in the size and shape of the spring can have huge implications on the mechanics of the finished book. I cannot stress too much that the spring should not be too tight on the back of the book; if it is too tight, the book will not open well and the text-block will not return back into position after opening.
To make the spring, take a piece of thin board no more than 1mm in thickness. Use a good-quality mill board, or boxboard. Its height should be about 100mm longer than the height of the book-block, and it needs to be wide enough to bend around the spine of the book and extend about 7mm over onto the lever on each side. The width is the most difficult measurement to judge. The board is completely wetted under a running tap and manipulated into a round with the use of a roller the same diameter as the width of the text-block at its widest point. The long edges of the spring are then worked over the edge of a bench with a bonefolder. The objective is to create a hooked edge to the spring that holds onto the book-block. The board can then be left to dry. I have found that a finishing press is invaluable for this, as it enables one to precisely adjust the spring to the correct diameter. A good tip is to use a Gator4 clamp as a gauge to measure the thickest part of the book. A pair of dividers can then be used to transfer the measurement from the clamp to the finishing press. Remember that when setting the diameter of the spring you will need to add a little extra to accommodate the layers of kraft paper that are to be added. The spring should then be left overnight to dry completely.

The second stage of making the spring is to wrap two or three layers of archival kraft paper all the way around the board for added strength. The number of layers will depend on the size of the book. I use EVA for this process. Start and finish lining the board on the inside, so that a ridge is not visible, and rub each layer down evenly as you go. When the spring is finished, return it to the finishing press; use the press to fine-tune the internal diameter of the spring. I have found that expansions and contractions in the spring can be unpredictable once the layers of kraft paper have been adhered. To stop any unwanted movement, insert a strip of mill board (cut to the width of the internal diameter) inside the spring. The spring should be left overnight again to dry completely. I have found that this method produces a spring that is very strong, and allows control over the diameter of the spring at all stages.
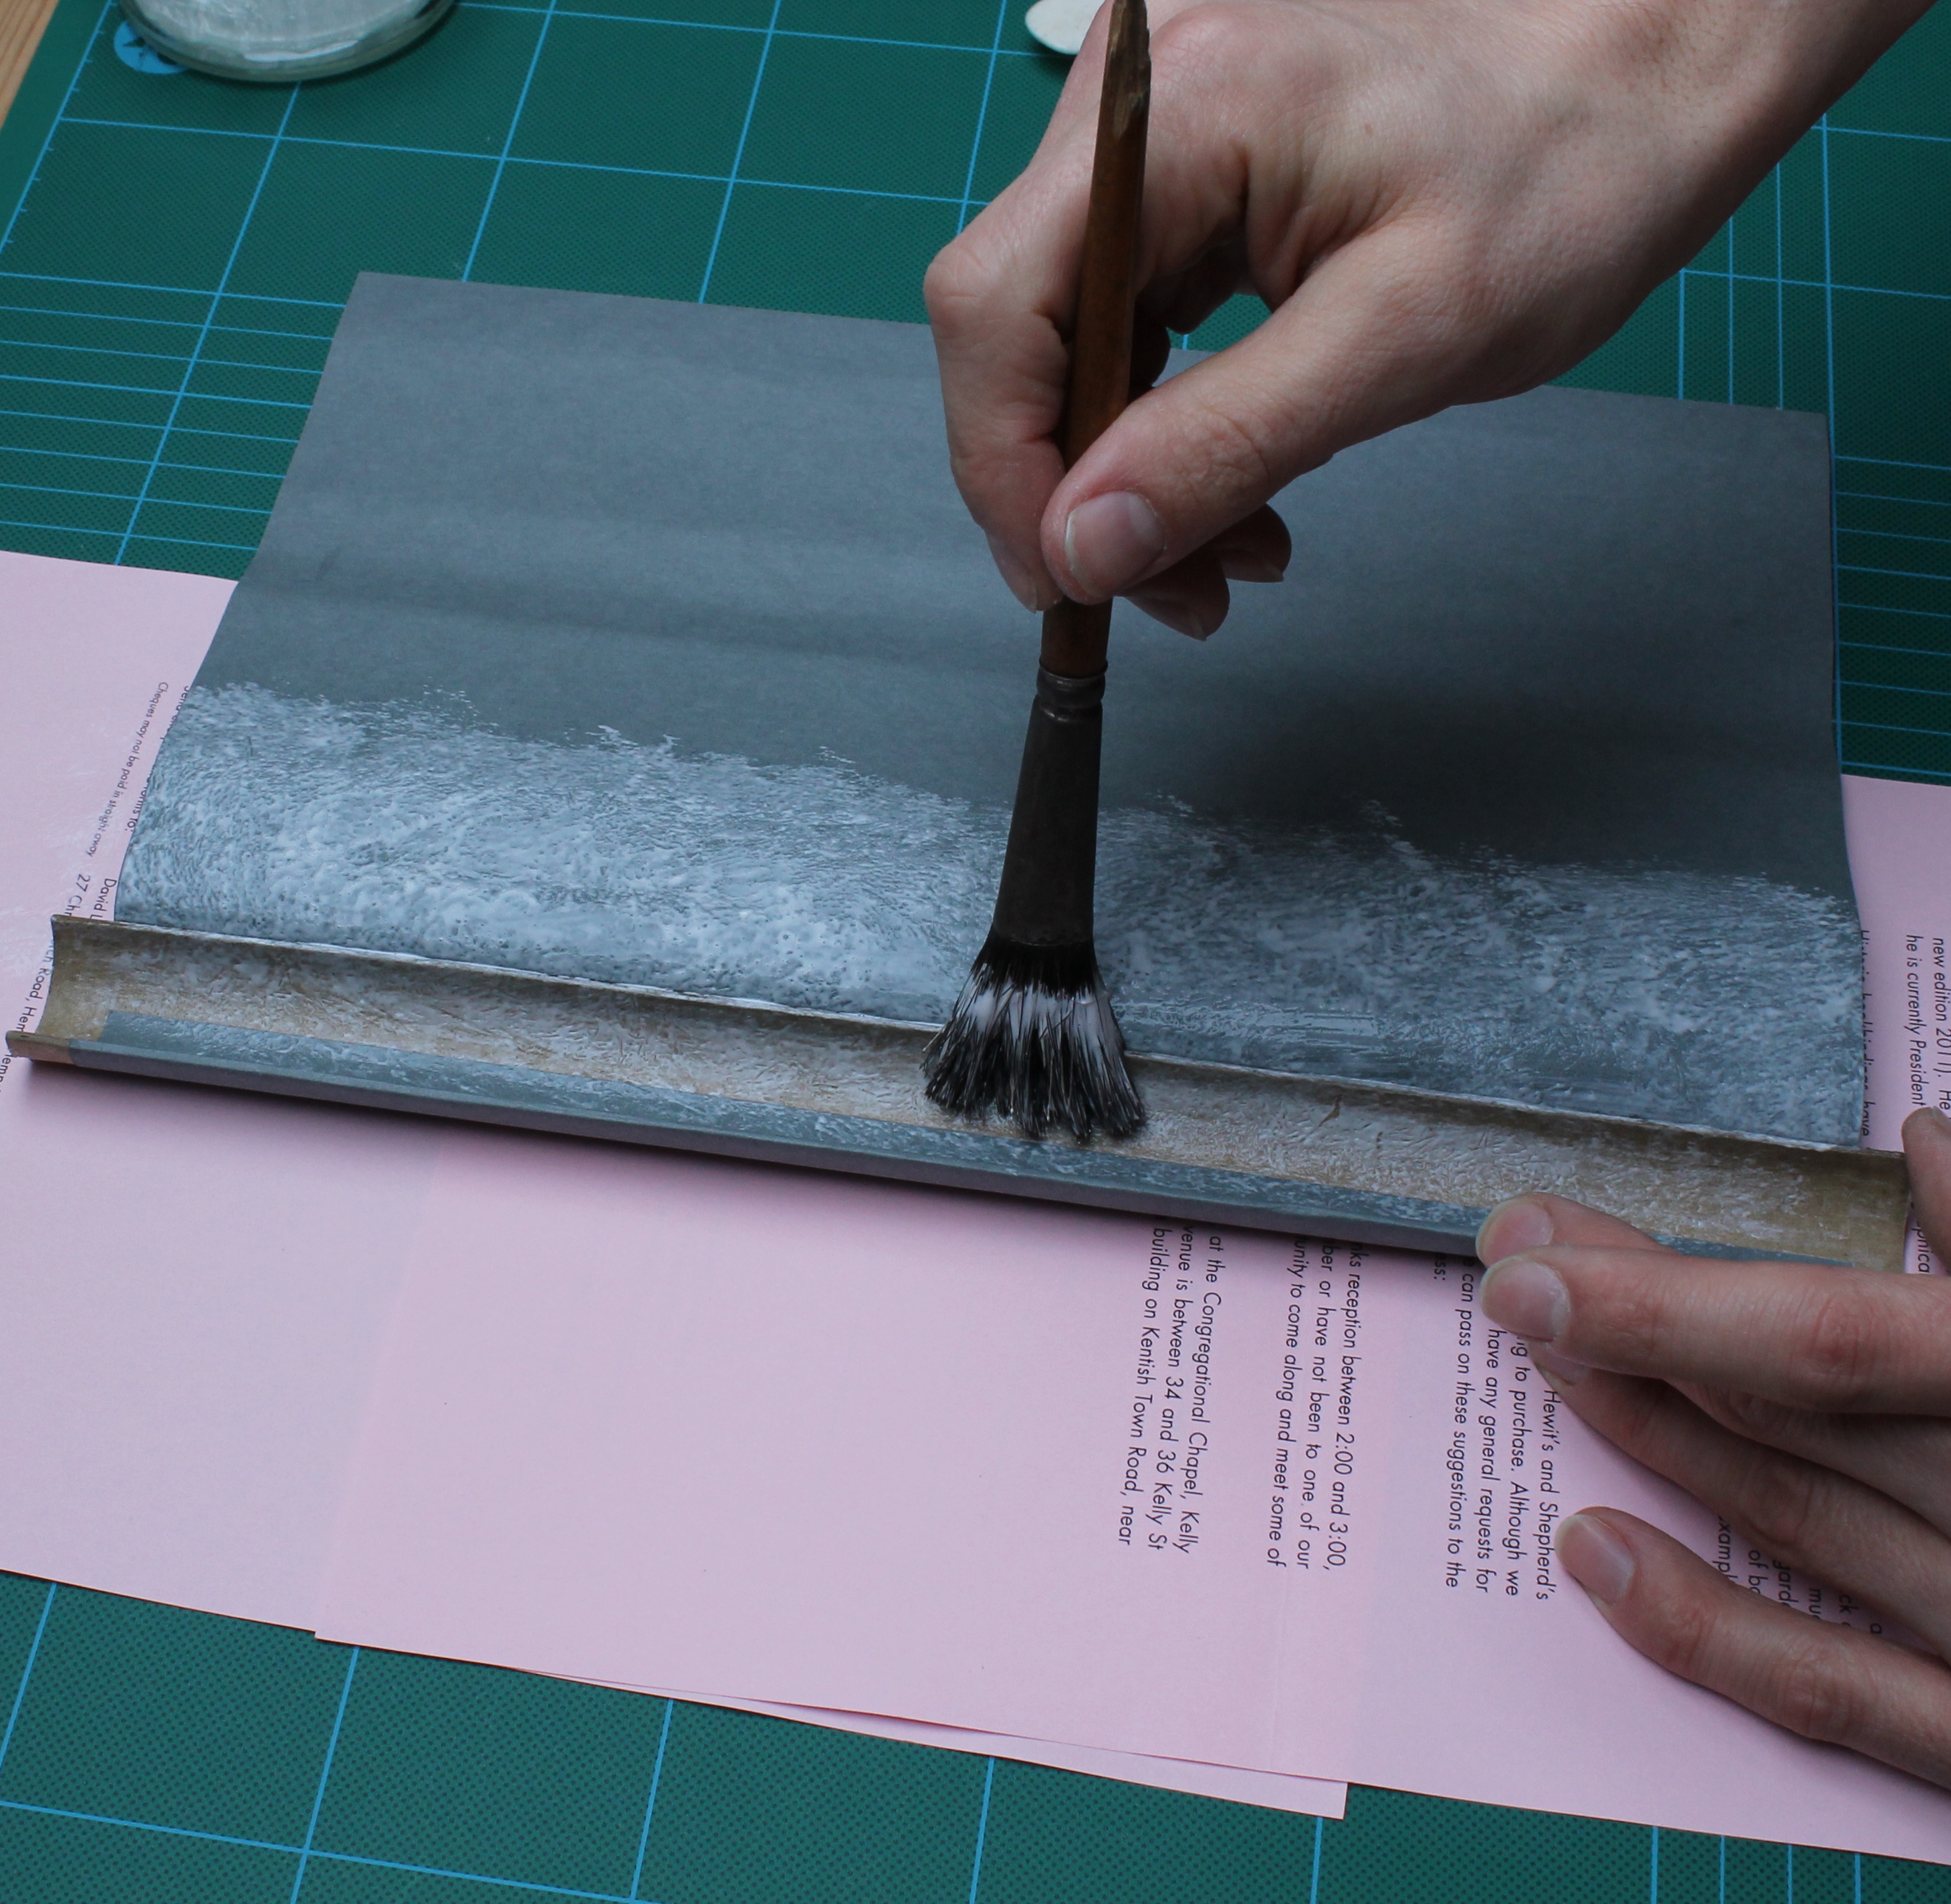
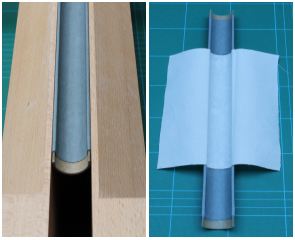
The spring is fastened to the spine of the book with a strip of cloth the same height as the lever. The cloth is adhered to the inside of the spring (with EVA), and when dry the spring is positioned onto the back of the book. The ends of the cloth are then pasted down onto the levers, fastening the spring in place. Again, it should be allowed to completely dry before proceeding to the next stage. I use aero-cotton for attaching the spring, as it has great strength and flexibility and is relatively thin. It is worth bearing in mind that sticking the cloth to the inside of the spring is likely to make the spring pull in on itself, reducing the internal diameter.
Conclusion
It is surprising how little has been written about springbacks, both historically and in more recent times. There is much scope for further research by bookbinders and conservators alike. I have really only scratched the surface in my own research, and have covered even less in this paper. I certainly think that there would be much merit in evaluating different adhesives used, and also the use of tackets to reinforce the sewing. My research shall continue…
‘The sewn account book is usually well-made, but ugly. It is time it lost its antiquated look. We need better brass type-faces for our lettering than can be found in the founders’ catalogue. Any printer would scorn to use such out worn designs. Our marbled papers and marbled edges are very drab. Let us have new marbled patterns or dispense with marbling altogether. Our sprinkled edges are also dull, and plain full coloured edges would be better. In our brighter world we need brighter ledgers.’
John Mason
Stationery Binding, 1946
Author contact information: www.greensbooks.co.uk
Bibliography
Green, Arthur. A Springback Stationery Binding: A step-by-step Tutorial. In: Bookbinder, vol. 25, 2011.
Mason, John. Stationery Binding. Pitman, 1946.
Middleton, Bernard C. A History of English Craft Bookbinding Technique. Oak Knoll Press & the British Library, fourth edition, 2000.
Monk, J. Leonard and Lawrence, W. F. A Textbook of Stationery Binding. Raithby, Lawrence and Co., LTD, 1912.
Tomlinson, Charles (ed.) Cyclopaedia of Useful Arts, vol 1., 1866.
Vaughan, Alex J. Modern Bookbinding. London: Robert Hale, 1944.
Verheyen, Peter D. and Conn, Donia. The Springback: Account Book Binding. In: The New Bookbinder, vol. 23, 2003.
Whetton, Harry (ed.) Practical Printing and Binding. London: Odhams Press Limited, 1946.
NOTES
1 ‘There is a fairly marked distinction between that part of the trade that deals with books for reading, known as letterpress binding, and those for written matter or accounts, know as stationery or vellum binding.’ Modern Bookbinding, Alex J. Vaughan 1944
2 Starching is done by brushing the washed tapes with wheat starch paste.
3 VWR wheat starch paste made with tap water to a ratio of 1:4 (measured by volume). It is cooked for 35 minutes and then left to cool. It is then sieved three times.
4 Gator clamp is a brand of bar clamp. It has a ratchet rather than a thread and can be operated with one hand.

If you stuck the Kraft to the spring with animal glue and nipped it you will still get your round but you won’t have to wait overnight for it to dry.
LikeLike
Reblogged this on debora ando print workshop.
LikeLike
Reblogged this on Twelve Quarters Studios and commented:
Another great little intro this time to forwarding Springback books
LikeLike