Introduction
This article describes a simple and functional technique developed to address the all-too-common problem of books with detached spine fragments. It needs to be stressed that this technique is not intended to replace full conservation treatments, such as a skilled cloth or leather re-back, but it offers a rapid and cost-effective means of re-joining a book with its spine fragments for storage and use, especially for ‘low-priority’, yet historical, books and bindings.
This technique grew out of a project that involved the treatment – within tight time constraints – of 20 early printed books, whose partially detached spines and spine fragments were stored separately in labelled archival envelopes.
The spines and fragments were thick, stiff and brittle, and there was a risk that the envelopes could be misplaced in the future; so there was a clear need to securely store them with their respective books in some kind of protective enclosure. The books, however, were already housed in expensive drop-spine permanent boxes covered in buckram, and it was not economically realistic to replace these boxes simply to accommodate the extra bulk of wrappers and Mylar® pockets.
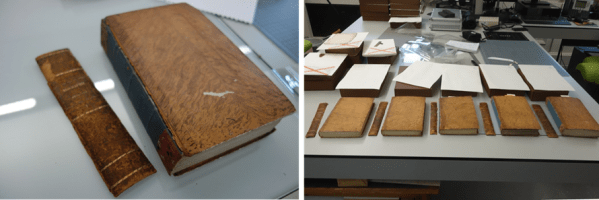
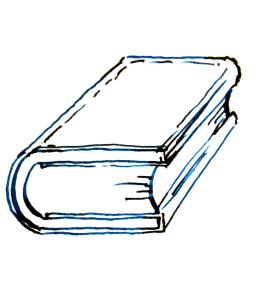
Early printed books with detached spines
The spine-pocket wrapper
To reunite and house the books with their detached spine fragments, we designed a 75-micron Mylar® polyester film wrapper with an inner ‘spine pocket’ that holds the fragment(s) in place. This construction is flexible and allows easy access to fragments.
Tools and materials needed:
- 75-micron Mylar® polyester film
- Ultrasonic spot welder
- Teflon folder
- Cutter
- Large cutting mat
- Metal ruler
- Permanent pen or Post-its
Step 1: Making the Mylar® outer wrapper
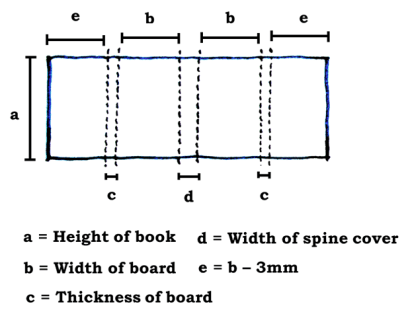
(1) Measure the book:
- Height = a
- Width of the board = b (from shoulder/joint to fore-edge, NOT from spine to fore-edge)
- Thickness of the boards = c
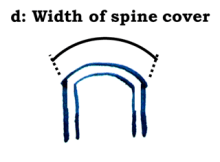
- Width of the spine from shoulder to shoulder (the distance between the ends of the spine cover) = d
These measurements give us an initial estimate of the dimensions of the Mylar® sheet to be used; note, however, that adjustments might need to be made when positioning the sheet, due, for example, to asymmetries in the book.

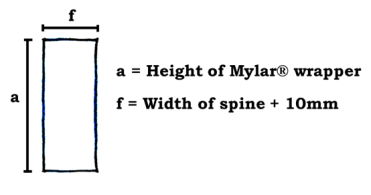
(2) Cut the Mylar® sheet according to the pattern below. Note that the turn-ins should be somewhat shorter (approximately 3 mm) than the width of the book to avoid damaging the object at the gutters. This shorter dimension is denoted as e below.
(3) Place the book on the Mylar® sheet and gently mark the folding positions (don’t fold yet!) along the edges of the book with a Teflon folder. We recommend a Teflon, rather than a bone, folder to avoid micro-abrasions to the Mylar®. Always make sure to mark the fold lines’ positions using the actual book, as shown below. If the spine is flat, mark the folding lines at the shoulders. If the spine is rounded, the shoulder doesn’t need folds.
Set the book aside, and fold the sheet on a flat surface at the marked edges’ positions with the Teflon folder, and crease gently for the shoulder marks (d in the diagram above). Each fore-edge folding position (c in the diagram above) should have a well-defined crease (two for each fore-edge).
Step 2: Making the inner spine pocket
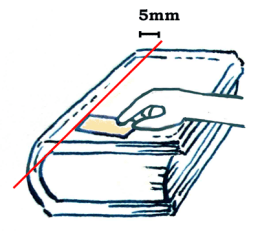
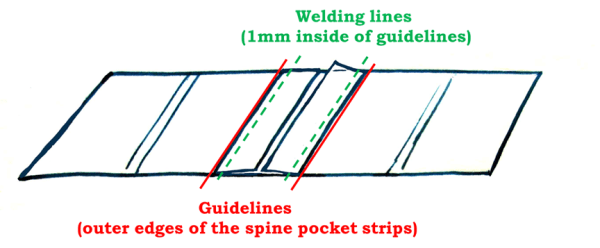
(1) Mark the Mylar® wrapper with vertical guidelines 5 mm inside the book shoulders on both boards. A permanent pen can be used and the line later removed with acetone; however, we prefer to mark the lines by placing a few Post-it notes on the Mylar®. These guidelines (in red on the figure below) indicate where to set the spine-pocket strips.
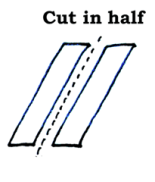
(2) Cut the Mylar® strip with the following dimensions: f *a, where f = d + 10 mm, and then cut it lengthwise into two strips of width f/2.
(3) In preparation for welding, place the prepared Mylar® wrapper flat on the desk with the inner side facing up.
(4) Set the outer edges of the spine-pocket strips along the guidelines on both sides (since Mylar® is transparent, we can see the Post-its/lines from the inside). This should leave a small gap between the two spine-pocket strips (see diagram below).
(5) The welding lines should be roughly 1 mm inside the edges of the two spine-pocket strips. Use a metal ruler to set the spot welder 1 mm inside the outer edges. This ruler also works as a weight to fix the spine-pocket strips in place. Start welding along the ruler.
For the octavo-size books involved in this project, the distance between each welding spot was roughly 20 mm, but as a general rule we recommend the following:
| Book size | Distance between welding spots |
| Folio | 30 mm |
| Quarto | 25 mm |
| Octavo | 20 mm |
| Sextodecimo | 15 mm |
The edges near the head and tail should be firmly welded, so the spots should be near the edges (~1 mm).


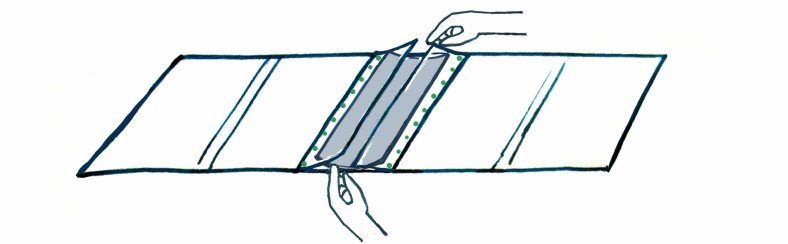
Welding the spine-pocket strips. The Post-it notes are used to align the strips, and the ruler is used to guide the welding.
(6) Open the flaps and place the spine fragment(s) inside the pocket. Then cover the book with the wrapper.


This technique works for completely detached spines and can be adapted for both partially detached ones and fragments by shortening the length of the spine pocket (see Examples 2 and 3 below).
Example 1: completely detached spine


Example 2: partially detached spine


Example 3: multiple fragments
We recommend making separate flaps for multiple fragments. In this case, the flaps should slightly overlap (5-10 mm) to ensure that the shorter flaps stay in position.


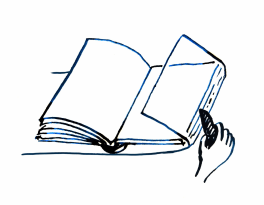
The spine-pocket wrapper in action
Following her MA in Conservation of Books & Library Materials at West Dean College, Mito Matsumaru worked at the Wellcome Trust as a book conservation contractor in 2017. She is currently working as a book conservator at Cambridge Colleges’ Conservation Consortium.
Stefania Signorello received both a Diploma and a Degree in Fine Arts before moving to Florence in 1991 to study Book and Paper Conservation. She gained work experience in Rome, Florence, Milan, and Prague before moving to London in 1997. She has since worked at a number of institutions in the UK, including the Victoria and Albert Museum, the Theatre Museum, the Bodleian Library and the Oxford University Archives. Stefania has been an accredited member of the Icon Book and Paper (B&P) Group since 2001 and has served as both Deputy Chair and Chair for the group’s managing committee. She has been working as a conservator at the Wellcome Collection since 2003.

Thank you, Stefania Signorello. A very neat and useful technique.
LikeLiked by 2 people
Thank you so much, I am glad you like it! Have you got any books in mind that you could use this technique on?
LikeLike
I believe so. I am planning some conservation projects which can be carried out while the library is closed. I hope I may write to you when I am ready to address this. Jane Giscombe.
LikeLiked by 2 people
Fantastic solution, congratulations and thanks a lot for sharing it!
LikeLiked by 2 people
Thank you so much Rita. Mito and I really enjoyed working on this project and on the article. We hope other conservators will find it useful too. Sharing is essential in our profession!
LikeLiked by 1 person
Greetings for Mito, from Spain 😉
LikeLiked by 1 person
Hello Rita, Thank you so much for your comment! I am very glad you enjoyed our post! 🙂
LikeLiked by 1 person
Fascinating! Thanks for such a clear write-up.
LikeLiked by 2 people
Thank you for your comment!
LikeLike
Simple and cost efficient. I love the idea and I will be applying it!
LikeLiked by 2 people
I am glad you like it! I am looking forward to hearing your comments about your own experience of making it.
LikeLike
Nice and elegant. It’s a good idea to apply from now on. Thank you!
LikeLiked by 2 people
Thank you for your comment, Berta. We would be happy to hear about your experience with this technique!
LikeLike
Indeed, a very cost-effective and practical solution to avoid physical separation of book parts (with desastrous consequences as seen in the past).
LikeLiked by 2 people
Yes, absolutely! And in addition to that, for a long time I have been conscious of the fact that trends and priorities might change over time. Books that might be considered ‘low priority’ ones, might not be so in the future (justifying more expensive and time consuming treatments, later on). So I feel very strongly that it is our duty to retain as much of our cultural heritage as possible, even if ‘just fragments’ which in the meantime are still available for us to observe and learn from: tooling, linings, etc.
LikeLike
Truly amazing Stefania
Thank you for sharing
With regards
Harry
LikeLike
That would be great! I feel that what counts is the idea, then we all need to adapt techniques to the collections we are working on and the equipment available to us. For example, I have found useful to have rolls of Mylar a little wider than our folio’s average height, so that it is easy to cut down to the desired height (no heavy material’s lifting involved!). Also, I know that ultrasonic welders used to be rather expensive, but the one we use is light and portable, and not very expensive at all, especially considering how much work I can get done with it.
I am looking forward to hearing about how you get on with the making of the wrappers, and any enhancements you might make. We can all learn a lot from one another!
LikeLike
Hi Stefania, really interesting. Can you share details of your ultrasonic welder please? Thanks, Jane
LikeLike
Hi Jane, we have two spot welders, but I use mostly the “HDS Portable hand-held ultrasonic spot welder”, because the other one is much heavier to move and too powerful to control while spot welding. The HDS website is currently undergoing an upgrade, but Harry Singh has said he is happy to send a PDF brochure to anyone who is interested in the welder. He can be contacted at: sales@hds-uk.demon.co.uk
LikeLike
Dear Stefania,
What a simple but effective idea, well done! It’s Great to have so many pictures and adding a film to show the end result is perfect- a mini tutorial!
LikeLiked by 2 people
Hi Amelia, that is such a good point! Videos can show so well practical tips and, generally, practical work.
LikeLike
I love the videos – when the book is shown closed with the spine in the wrapper you would never know it is actually fully detached – it is lined up perfectly and looks completely stable inside the Melinex when it is opened/closed. Ingenious!
LikeLiked by 1 person
Dear Marc, thank you very much for your comment. We are very glad you enjoyed the videos!
A small yet important comment with regard to the stability of the detached spine – the thickness of the Mylar® is key. For this project I experimented with various grades and found that 75 micron Mylar® was most suitable. (50 micron did not provide enough support and 100 micron was a bit too rigid.)
We look forward to hearing about applications!
LikeLike
This is a great idea that addresses a practical need. Do you all have any experience using this wrapper for oversize books with thick, rigid, heavy spine coverings? I often work on 19th-century government account books whose spine coverings can be around 1 cm thick, plus around 0.5 cm additional thickness for false bands. These inflexible spine coverings often detach. I’m considering how to use your pocket design and keep the heavy spine coverings from potentially falling out the bottom during handling.
LikeLike
Stefania replies: This is a very interesting comment and problem. In my view, our technique mostly works on sizes up to folios and when spine fragments are not too thick, large and rigid (and heavy).
I can see that our technique would need an extra layer of sophistication for thick and heavy fragments.
I wonder whether a partial Mylar v-hinge (but with a double crease) spot-welded only onto the main wrapper piece, under each spine fragment, even just 10 mm wide, would work? It would need to be positioned only in the middle of the width of the pocket and spot-welded as little as possible, perhaps with no more than two welds, to avoid deformations in the Mylar. One would have to play with Mylar of different thicknesses to see which one would work best.
It’s all possible, but we would need to think about how to keep it still a simple, and fast, enough process.
As I was saying, this is a very interesting problem, and I thank you so much for raising it. Would you be willing to try the v-hinge (but with a double crease) and tell us if this potentially might work?
LikeLike
Thank you so much for sharing such a ingenious, practical and useful technique! It works very good!!
LikeLike
Thanks for the info on the welder, Stefania, I’ll contact Harry Singh. Jane
LikeLike
Hi Tulvi, thank you so much for such a positive comment! So, it looks like you have had the chance to try this technique?
LikeLike
An excellent technique and so well explained. Thank you, it is going to be so useful.
LikeLike