1) Introduction
Conservation practice is often a mix of science, craft and tradition. During my years of study in Japan and the UK, I discovered that many preparations were not “off the shelf” standard products, but rather each studio used different ingredients and processes.
The humble starch paste we use in paper and book conservation is one of these preparations. It is deceptively simple, but its making requires time, skill and effort. As I have painfully learned, it is both very easy and incredibly frustrating to mess up a batch of paste.
In this article I will attempt to provide practical hints for paste making, in the hope of saving my fellow conservators some frustration. This will be illustrated through two recipes, one for small batches (200 g), and one for larger batches of paste (1 kg or more).
I am very thankful for the invaluable insights and kind advice of Ms. Kyoko Kusunoki, conservator at the Hirayama Studio of the British Museum.
2) Generalities, ingredients and tools
The recipes below try to balance simplicity with the quality of the end product, however it is important to keep in mind that any recipe is approximate and that the paste maker must adapt to variations in both the quality of the ingredients and the environment.
It is also critical to understand from the onset that paste making cannot be rushed. The most common error I made in my early paste making attempts was to try to “cut corners”. Shorter soaking or cooling times, higher cooking heat and other “time-saving” strategies almost invariably led to less-than-satisfactory results.
Regarding the required ingredients and tools:
- Shofu wheat starch
- Deionized water
- A graduated beaker
- A thick-bottomed cooking pot. This is to allow for a slow and even distribution of heat during cooking. Preferably use a stainless-steel or enamelled pot and not an aluminium or copper one, which may transfer metal ions to the paste. Also make sure that the pot is of a sufficient size for your batch of paste: there will be a lot of energetic stirring of the mixture and a lot of splattering if the pot is too full. In my case, the paste mixture doesn’t reach over two thirds of the height of the pot.
- A round wooden stick for stirring the paste; typically, a thin rolling pin does the trick. Make sure the wood is untreated/undyed or it risks leaching into the paste and ruining your batch – as I unfortunately know from experience! Some conservators prefer using a wooden spoon, but I find a stick more practical for an even stir.
- A gas range or electric heating plate
- A traditional Japanese horse-hair sieve or, alternatively, a thin silkscreen sieve
- A Japanese wooden rice spoon (shamoji)
3) Small-batch recipe
This is a recipe I developed at West Dean College to make a small batch of roughly 200 g of paste, an amount I found sufficient to cover the needs of a small team of three conservation students for a week (depending on the work, of course).
Step 1: Soaking
Mix a 1/5 (w/v) ratio of starch and water, here 40 g of Shofu wheat starch with 200 cc (200 g) of deionized water in the beaker. Stir the mixture thoroughly and let it rest at least overnight. I have seen some studios in Japan soak for a much longer period (up to six months), but this requires very tight control and is impractical for small batches. This initial soaking phase allows the starch to start gelling and reduces the cooking time. I found this useful when preparing small batches of paste, which can easily form lumps. Mark the level of the mixture on the beaker, as it will be needed later.
The next day, empty as much of the excess water from the beaker as possible and top up with clean, deionized water to the level marked the night before. Stir gently, and then pour into the pot.
Step 2: Cooking
Put the pot on a medium heat and start stirring.
It is crucial to keep a constant, thorough and vigorous stirring motion throughout the cooking phase to avoid the development of lumps and reduce the risk of burning the paste. Use an irregular, circular motion of about two to three cycles per second that covers the whole surface of the pot. If you only stir at the periphery of the pot, lumps will develop in the middle.
The mixture will start to simmer. This should take about five minutes.
Keep stirring. In a few minutes (two to three), the mixture will start to thicken and take on a jelly-like texture with a translucent appearance. First, jelly lumps will start to appear; make sure to stir vigorously until the paste is an even, creamy, texture with a translucent appearance. Increase the heat to high. I usually set the electric heating plate to 300-350 °C/570-660 °F.
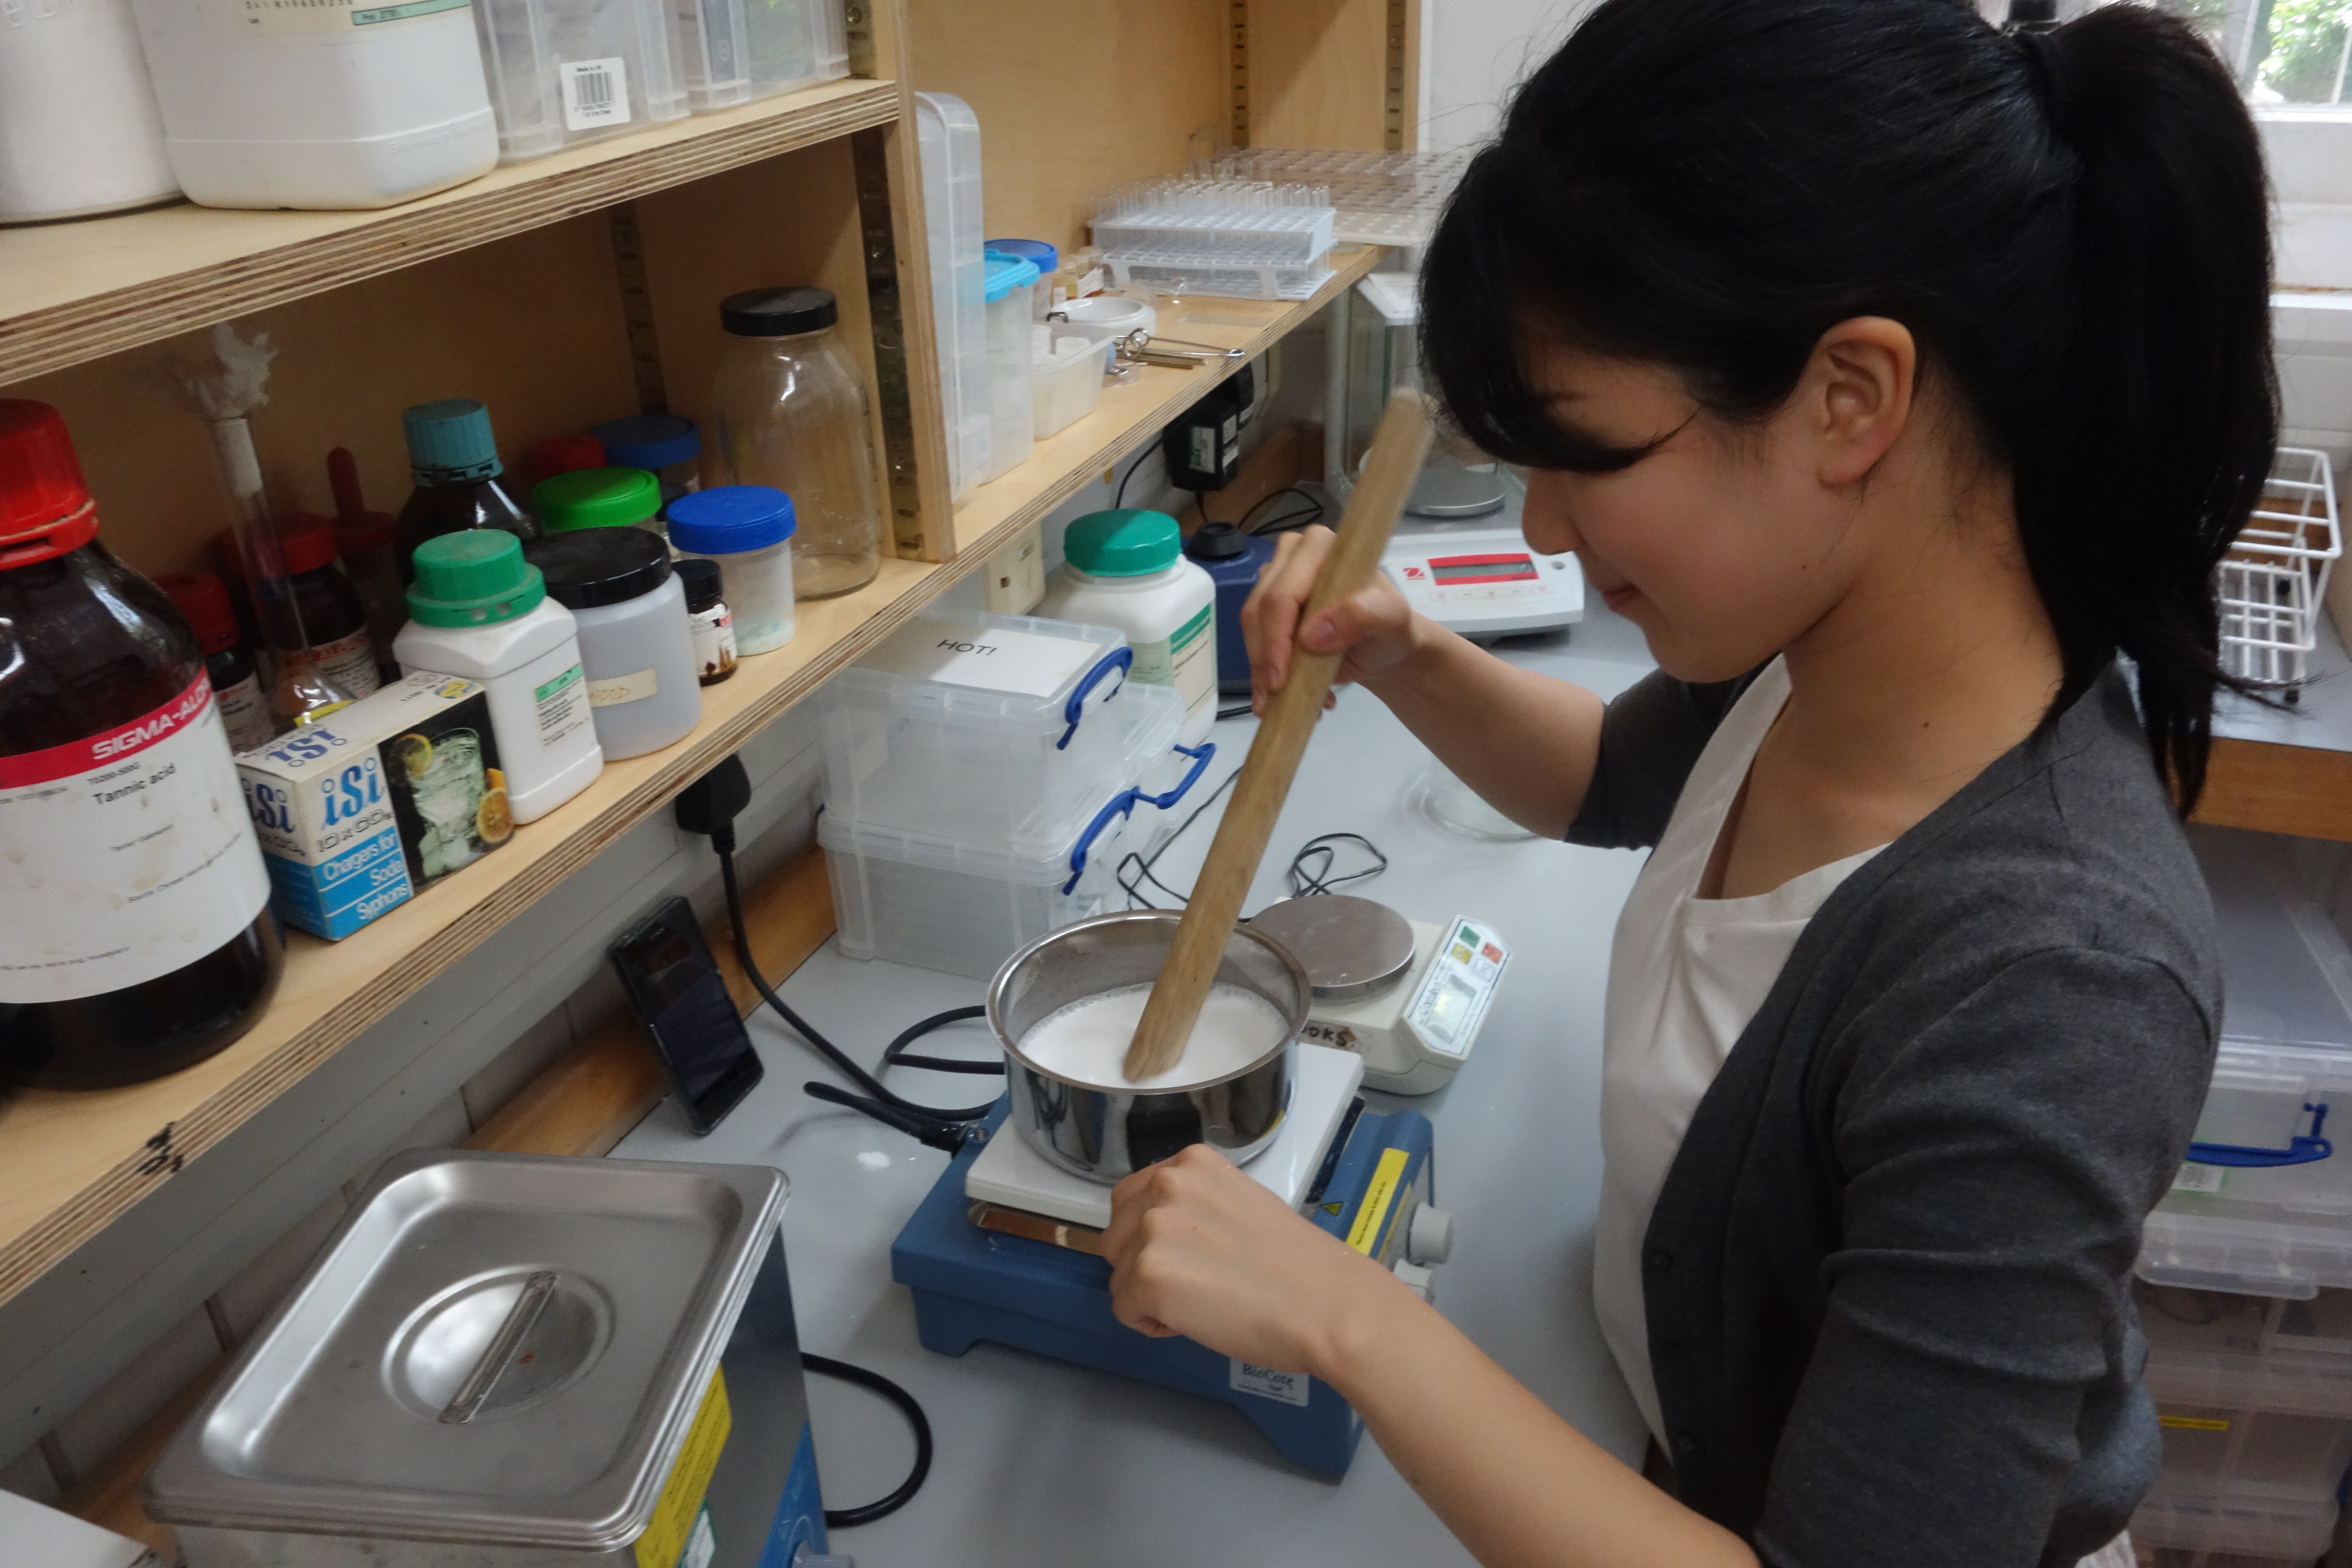
Fig.1 Mito stirring
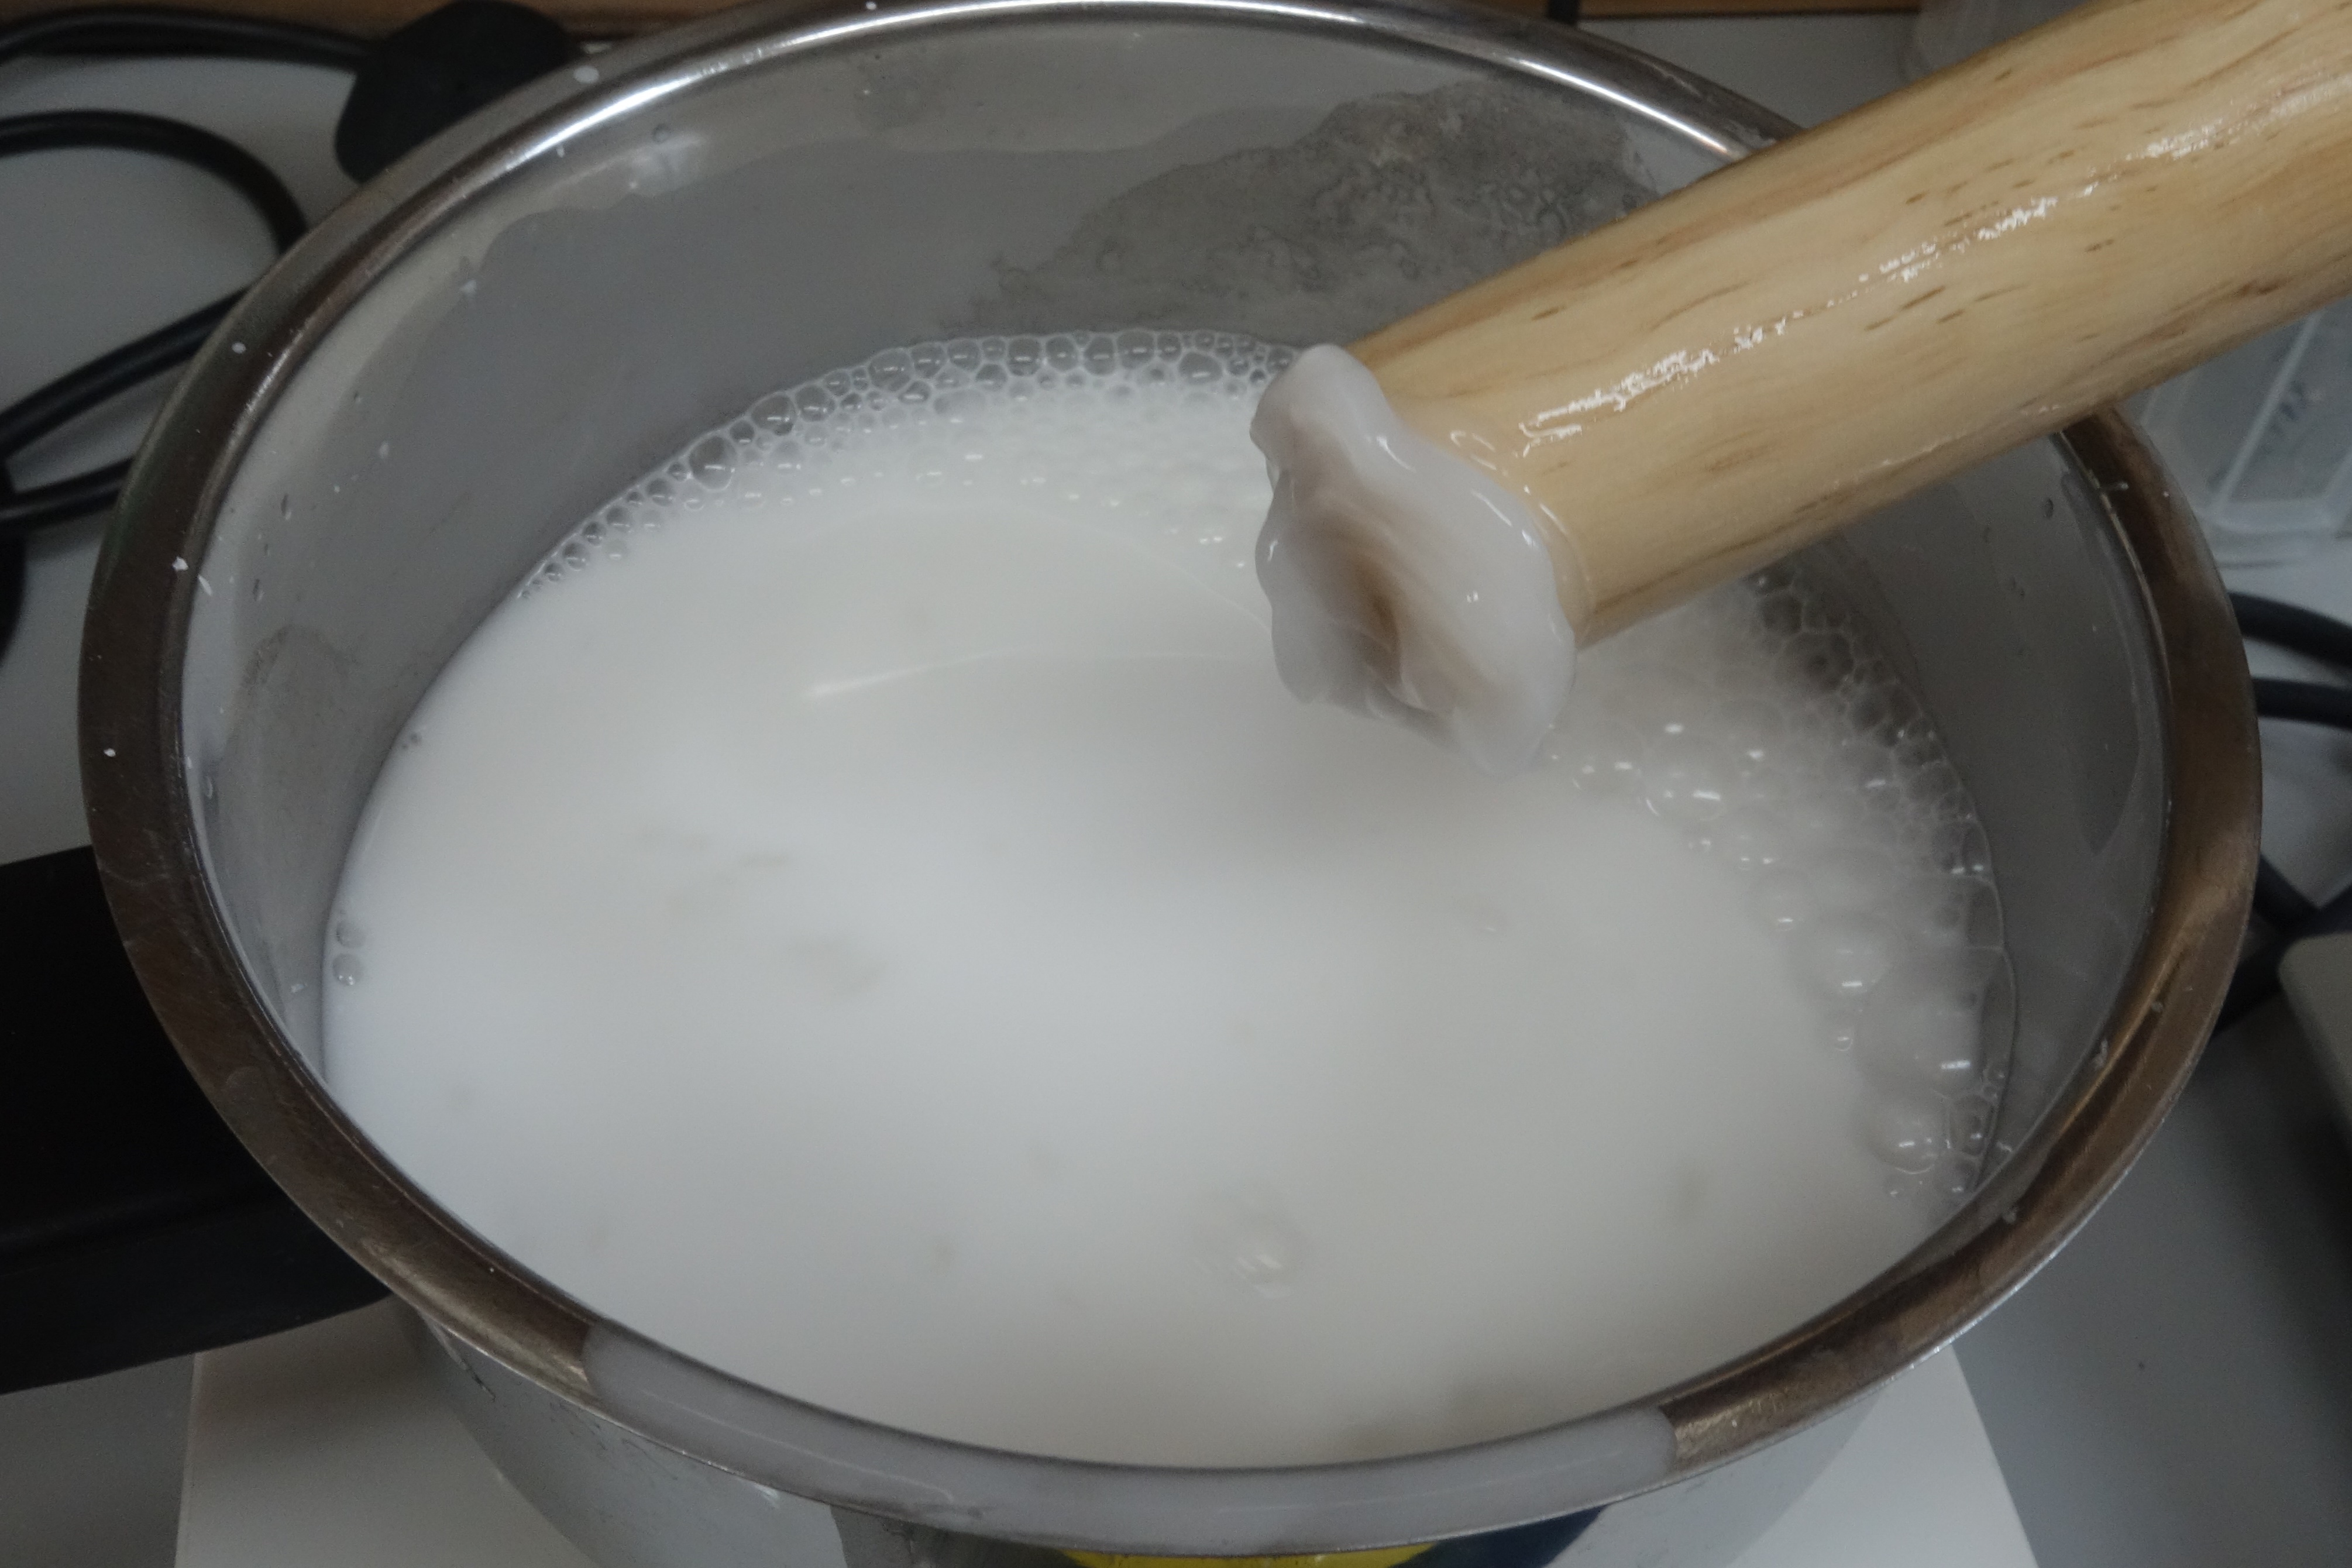
Fig.2 Starting to reach jelly texture
The mixture will progressively become creamy, and more transparent and viscous, with larger bubbles breaking through.
After another five to ten minutes, as the mixture loses water, it will become more compact and take on a shiny appearance. A thin layer of dry paste will appear on the sides of the pot. Keep on stirring!
After another five to ten minutes, the mass becomes even more compact and quite sticky.
A sign of the readiness of the paste is that a thin thread of paste remains attached to the stick when it is lifted out of the mixture.
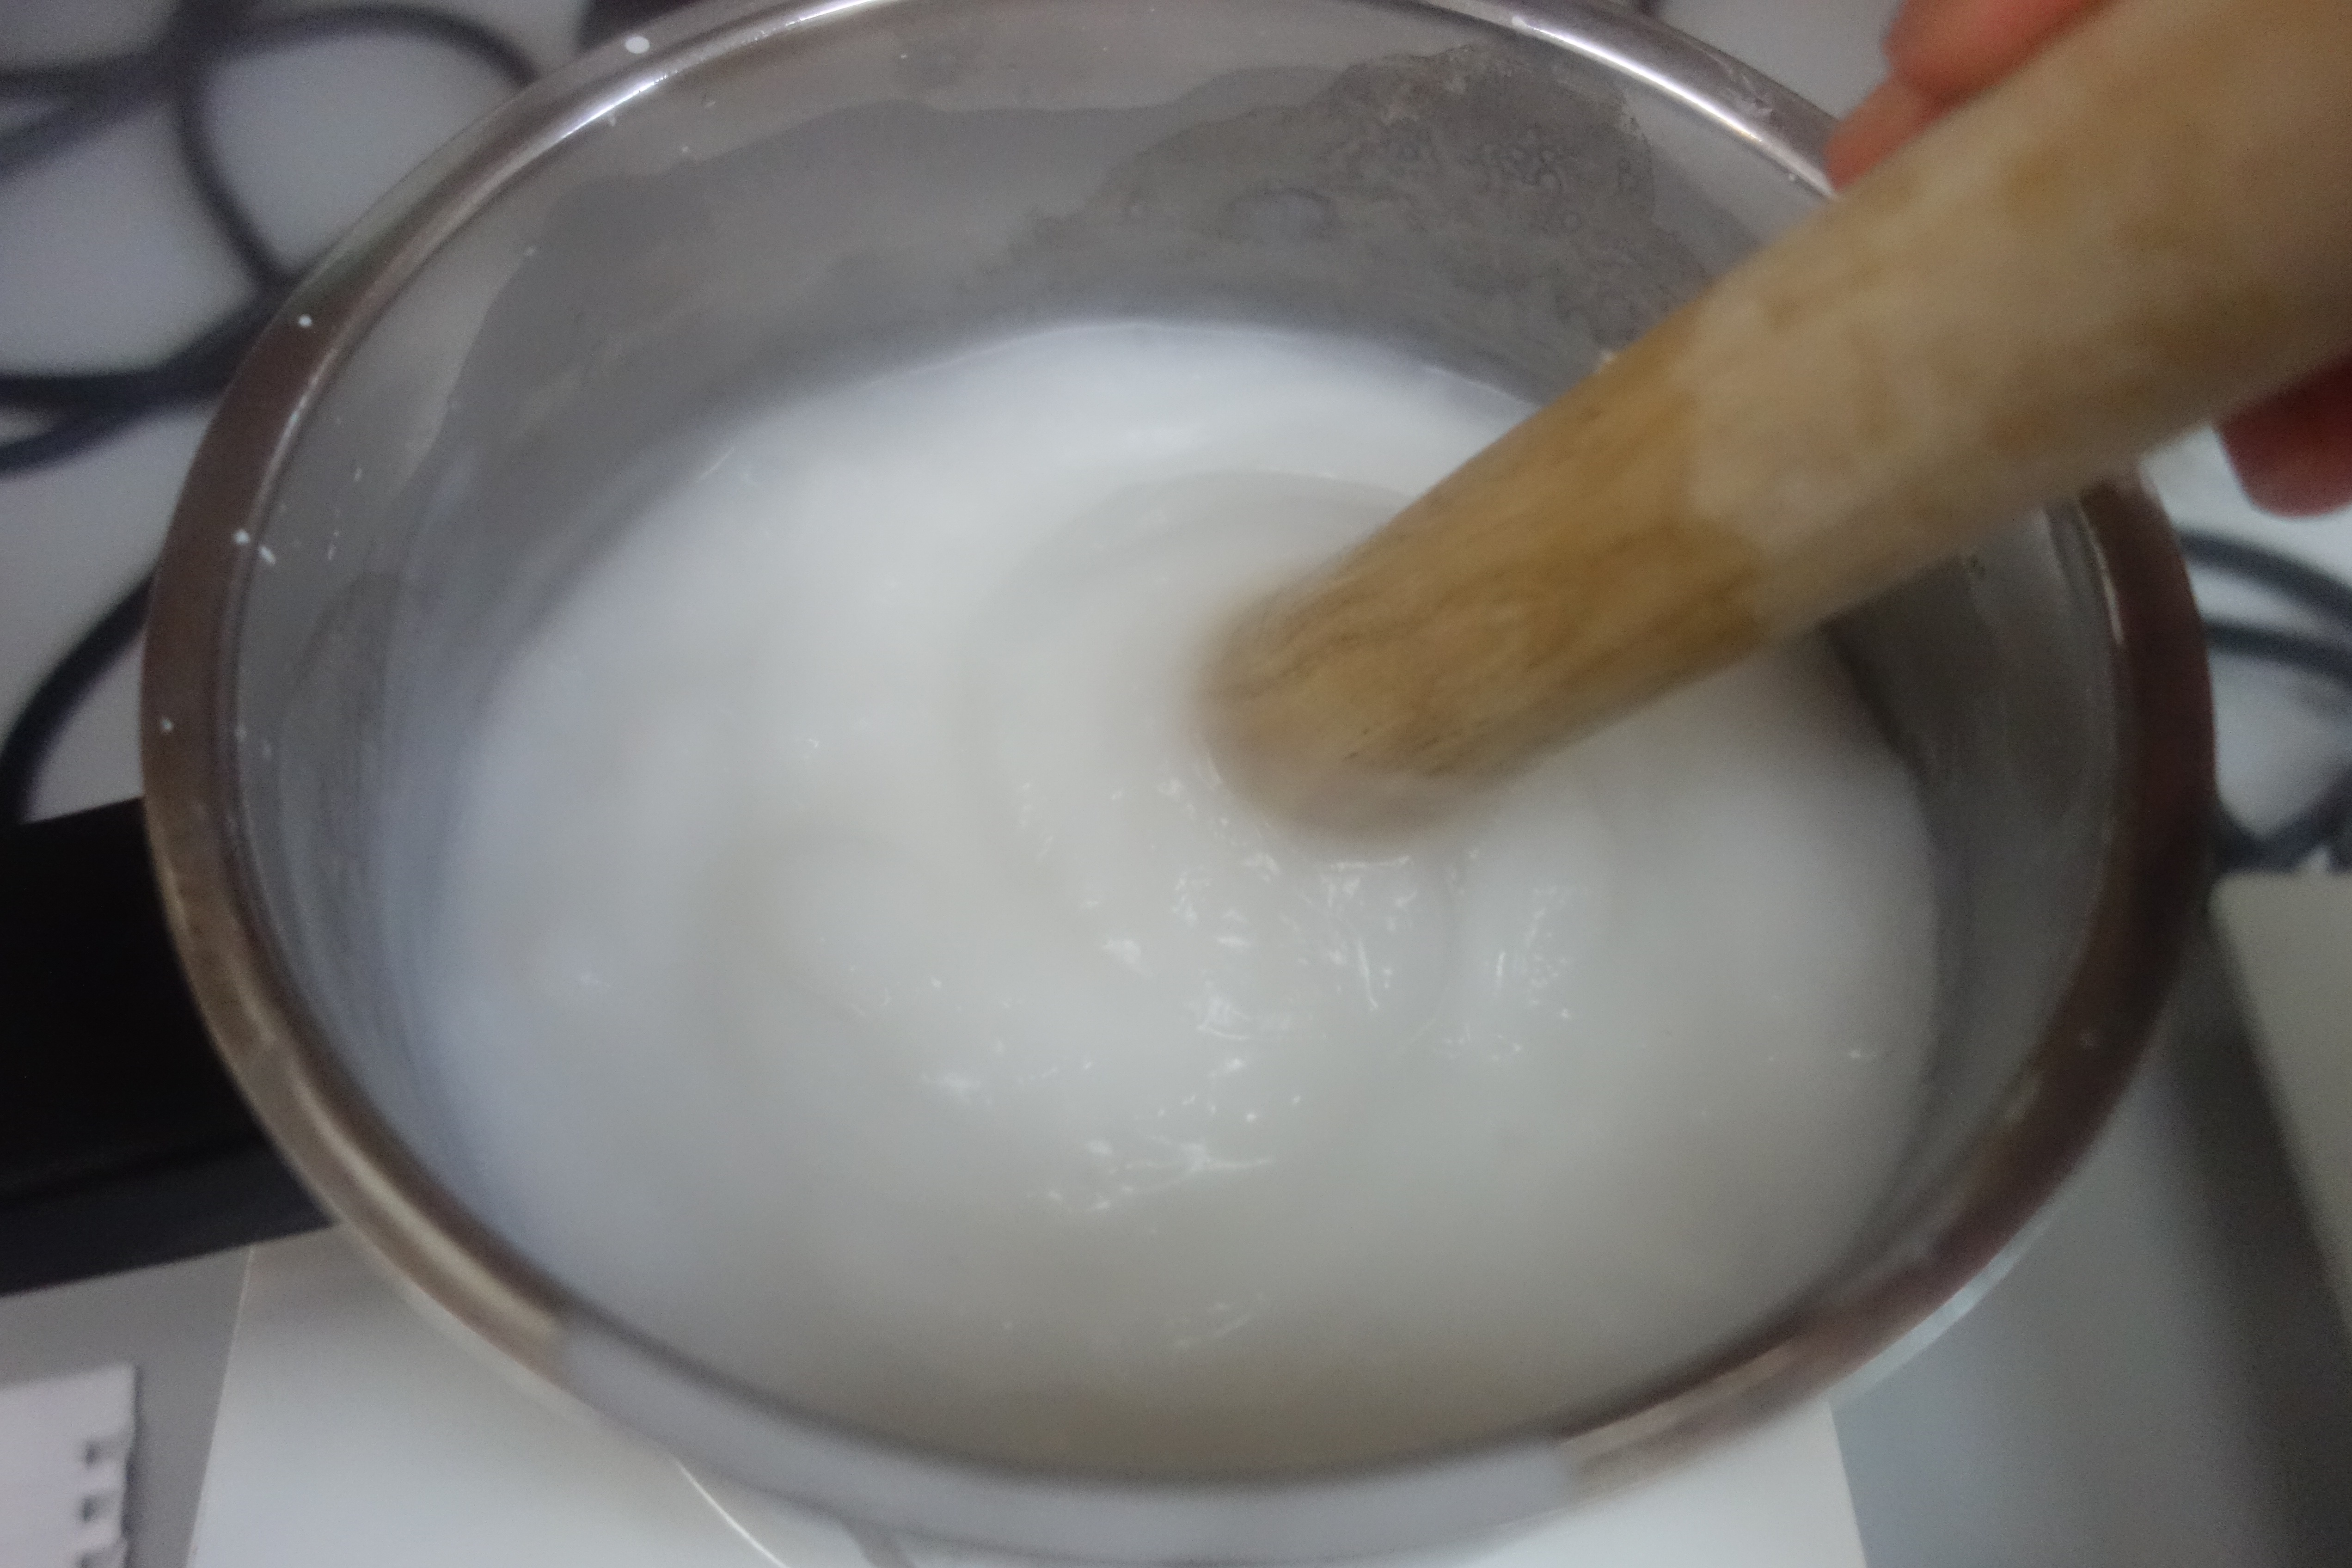
Fig.3 Creamy texture

Fig.4 Transparent, bubbly texture

Fig.5 Viscous, sticky texture
The whole cooking process can take between 20 and 25 minutes with constant and intense stirring…this is quite physical and can require a bit of practice.
Step 3: Cooling
Once the paste is cooked, remove the pot from the heat and immediately spoon the paste into a clean beaker. Be careful not to scrape the bottom of the pot as you don’t want to include any dried material.
Place the beaker into a larger container with cold water, cover it with a clean cloth and let it cool until it reaches room temperature (maybe about one hour).
Step 4: Sieving
After the paste has cooled, prepare for sieving.
If you are using a traditional horse-hair sieve, first soak it for about 20 minutes in cold water. Place the sieve on a clean tray and scoop out small amounts of paste with the Japanese rice wooden spoon (shamoji).
Massage each spoonful into the sieve surface by gently rubbing the spoon against it, using small circular motions.
Make sure the sieve mesh is oriented at a 45-degree angle to your body. Then repeatedly press the spoon on the sieve towards you to push the paste through.
Repeat this process until all of the paste has been sieved.
Once this is complete, collect the paste from the tray and repeat the operation another two times. This will produce a very smooth, sticky and homogeneous paste.

Fig.6 Paste before sieving
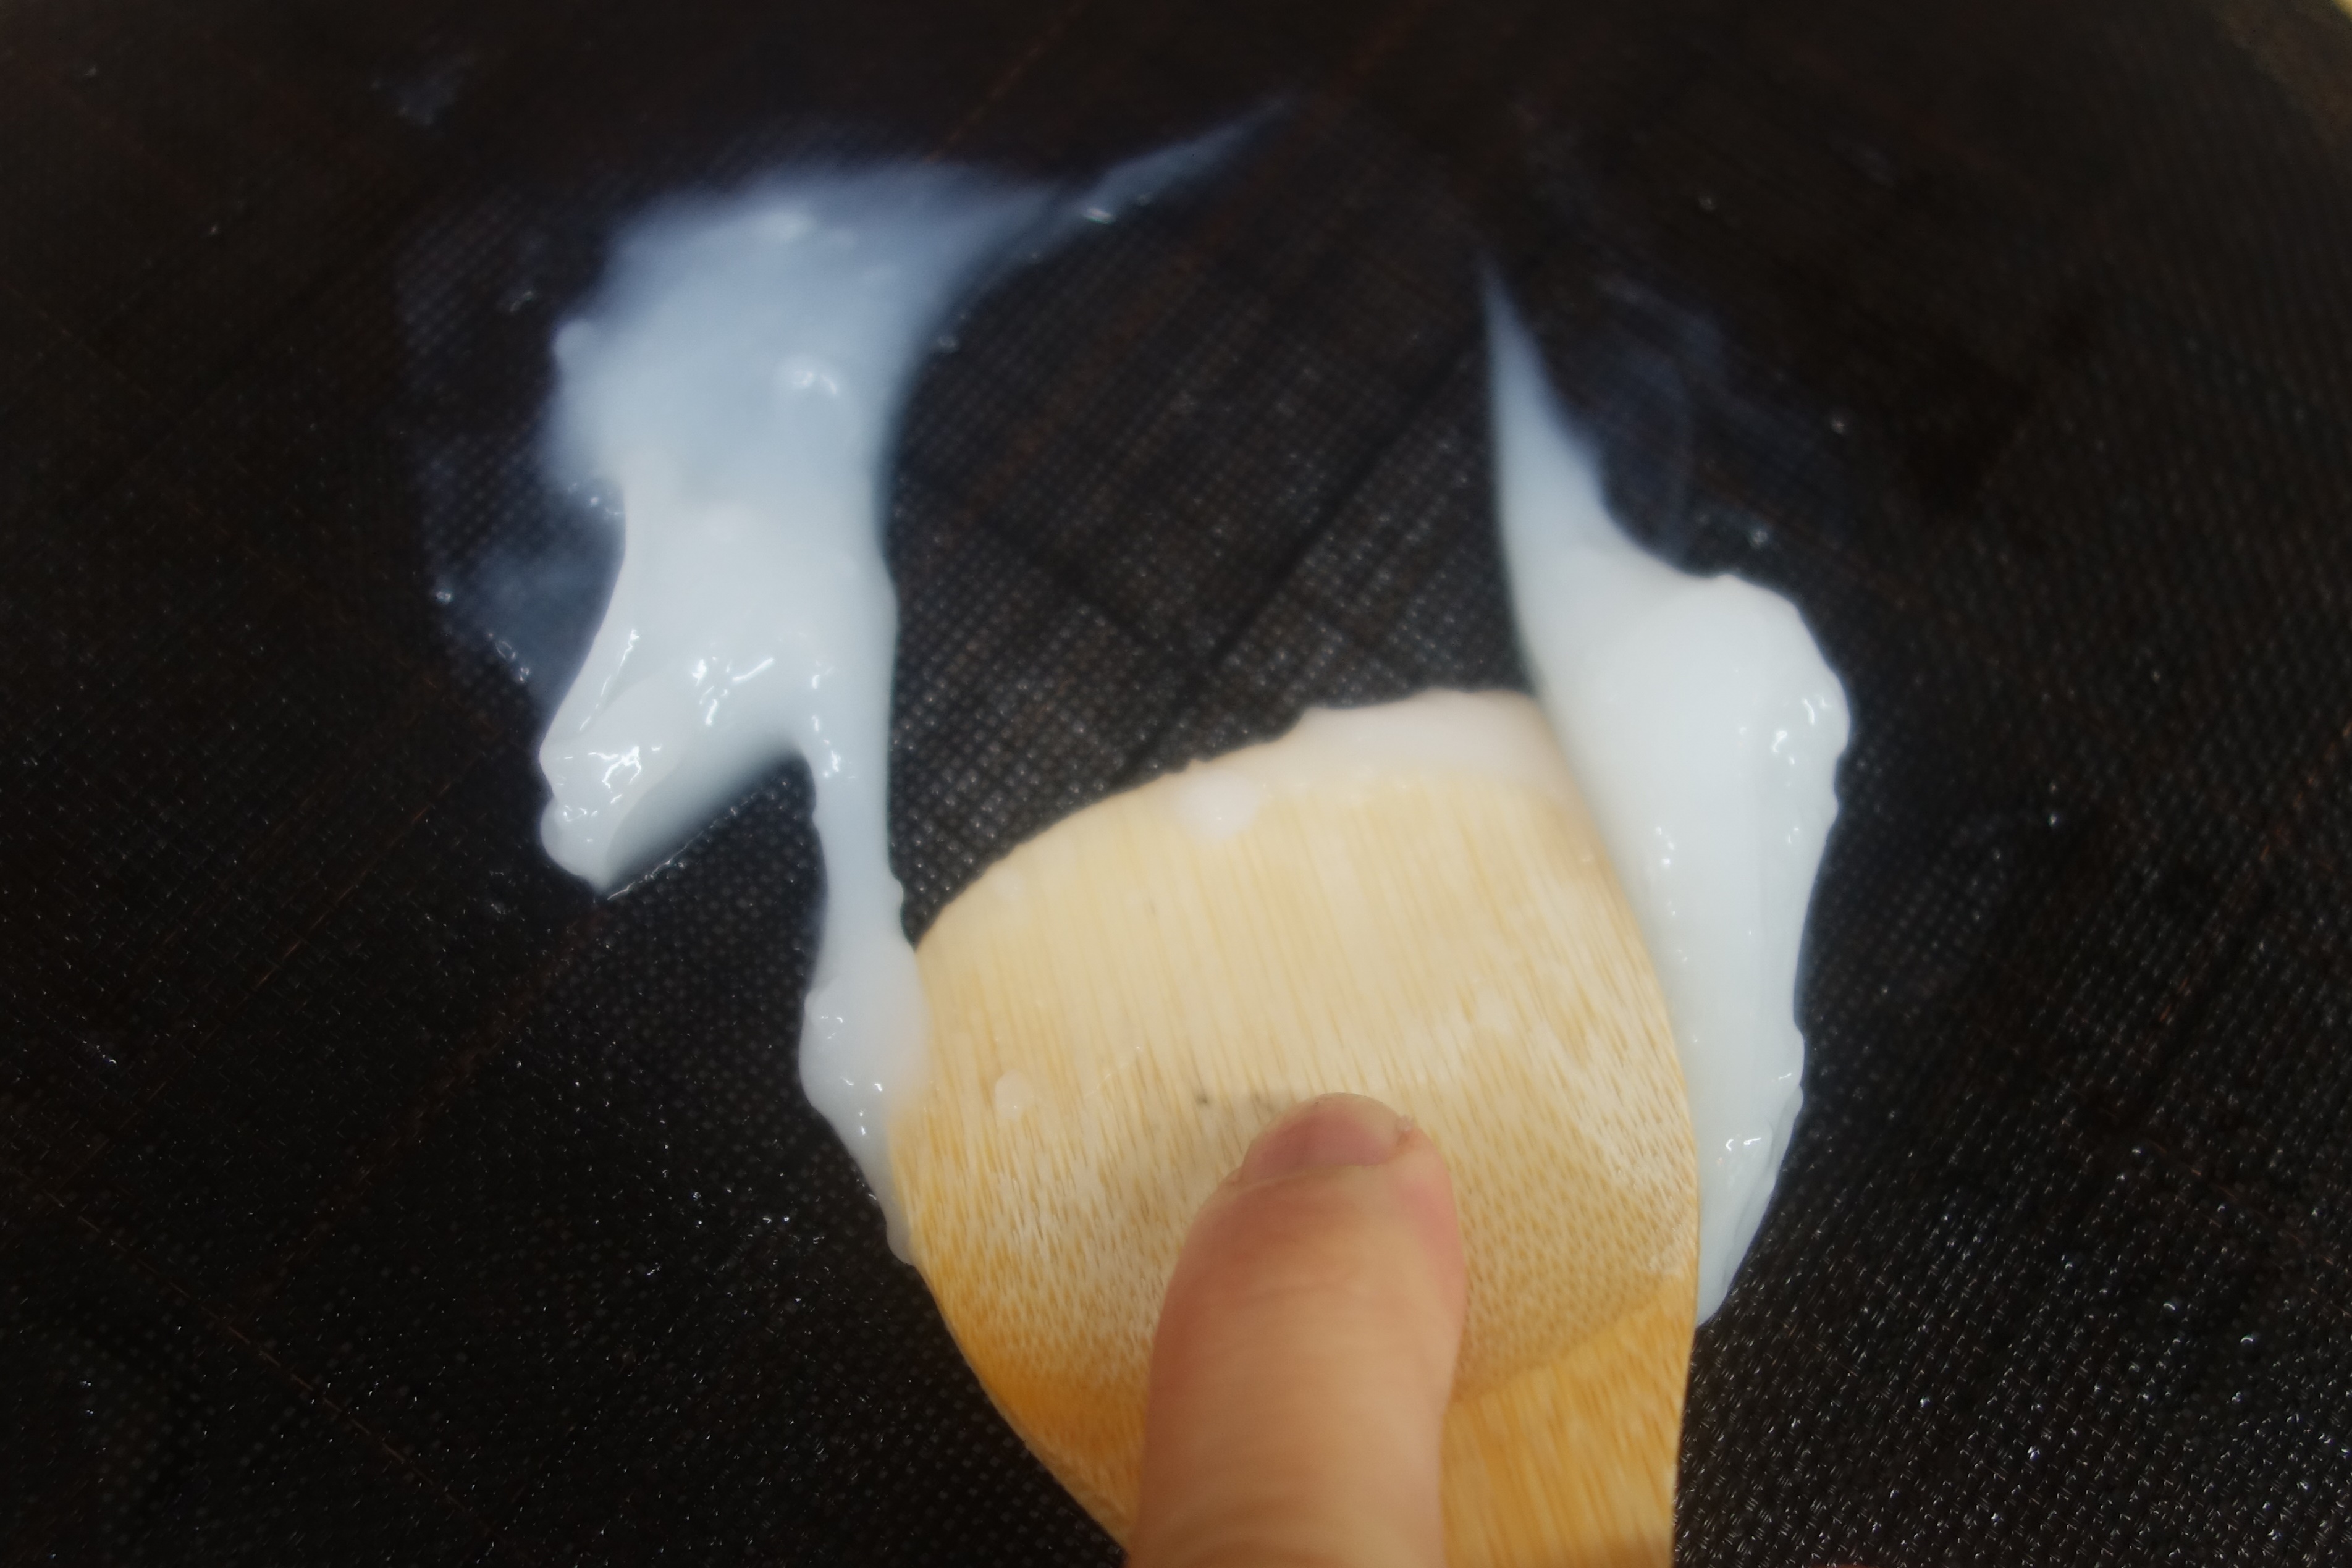
Fig.7 Sieving
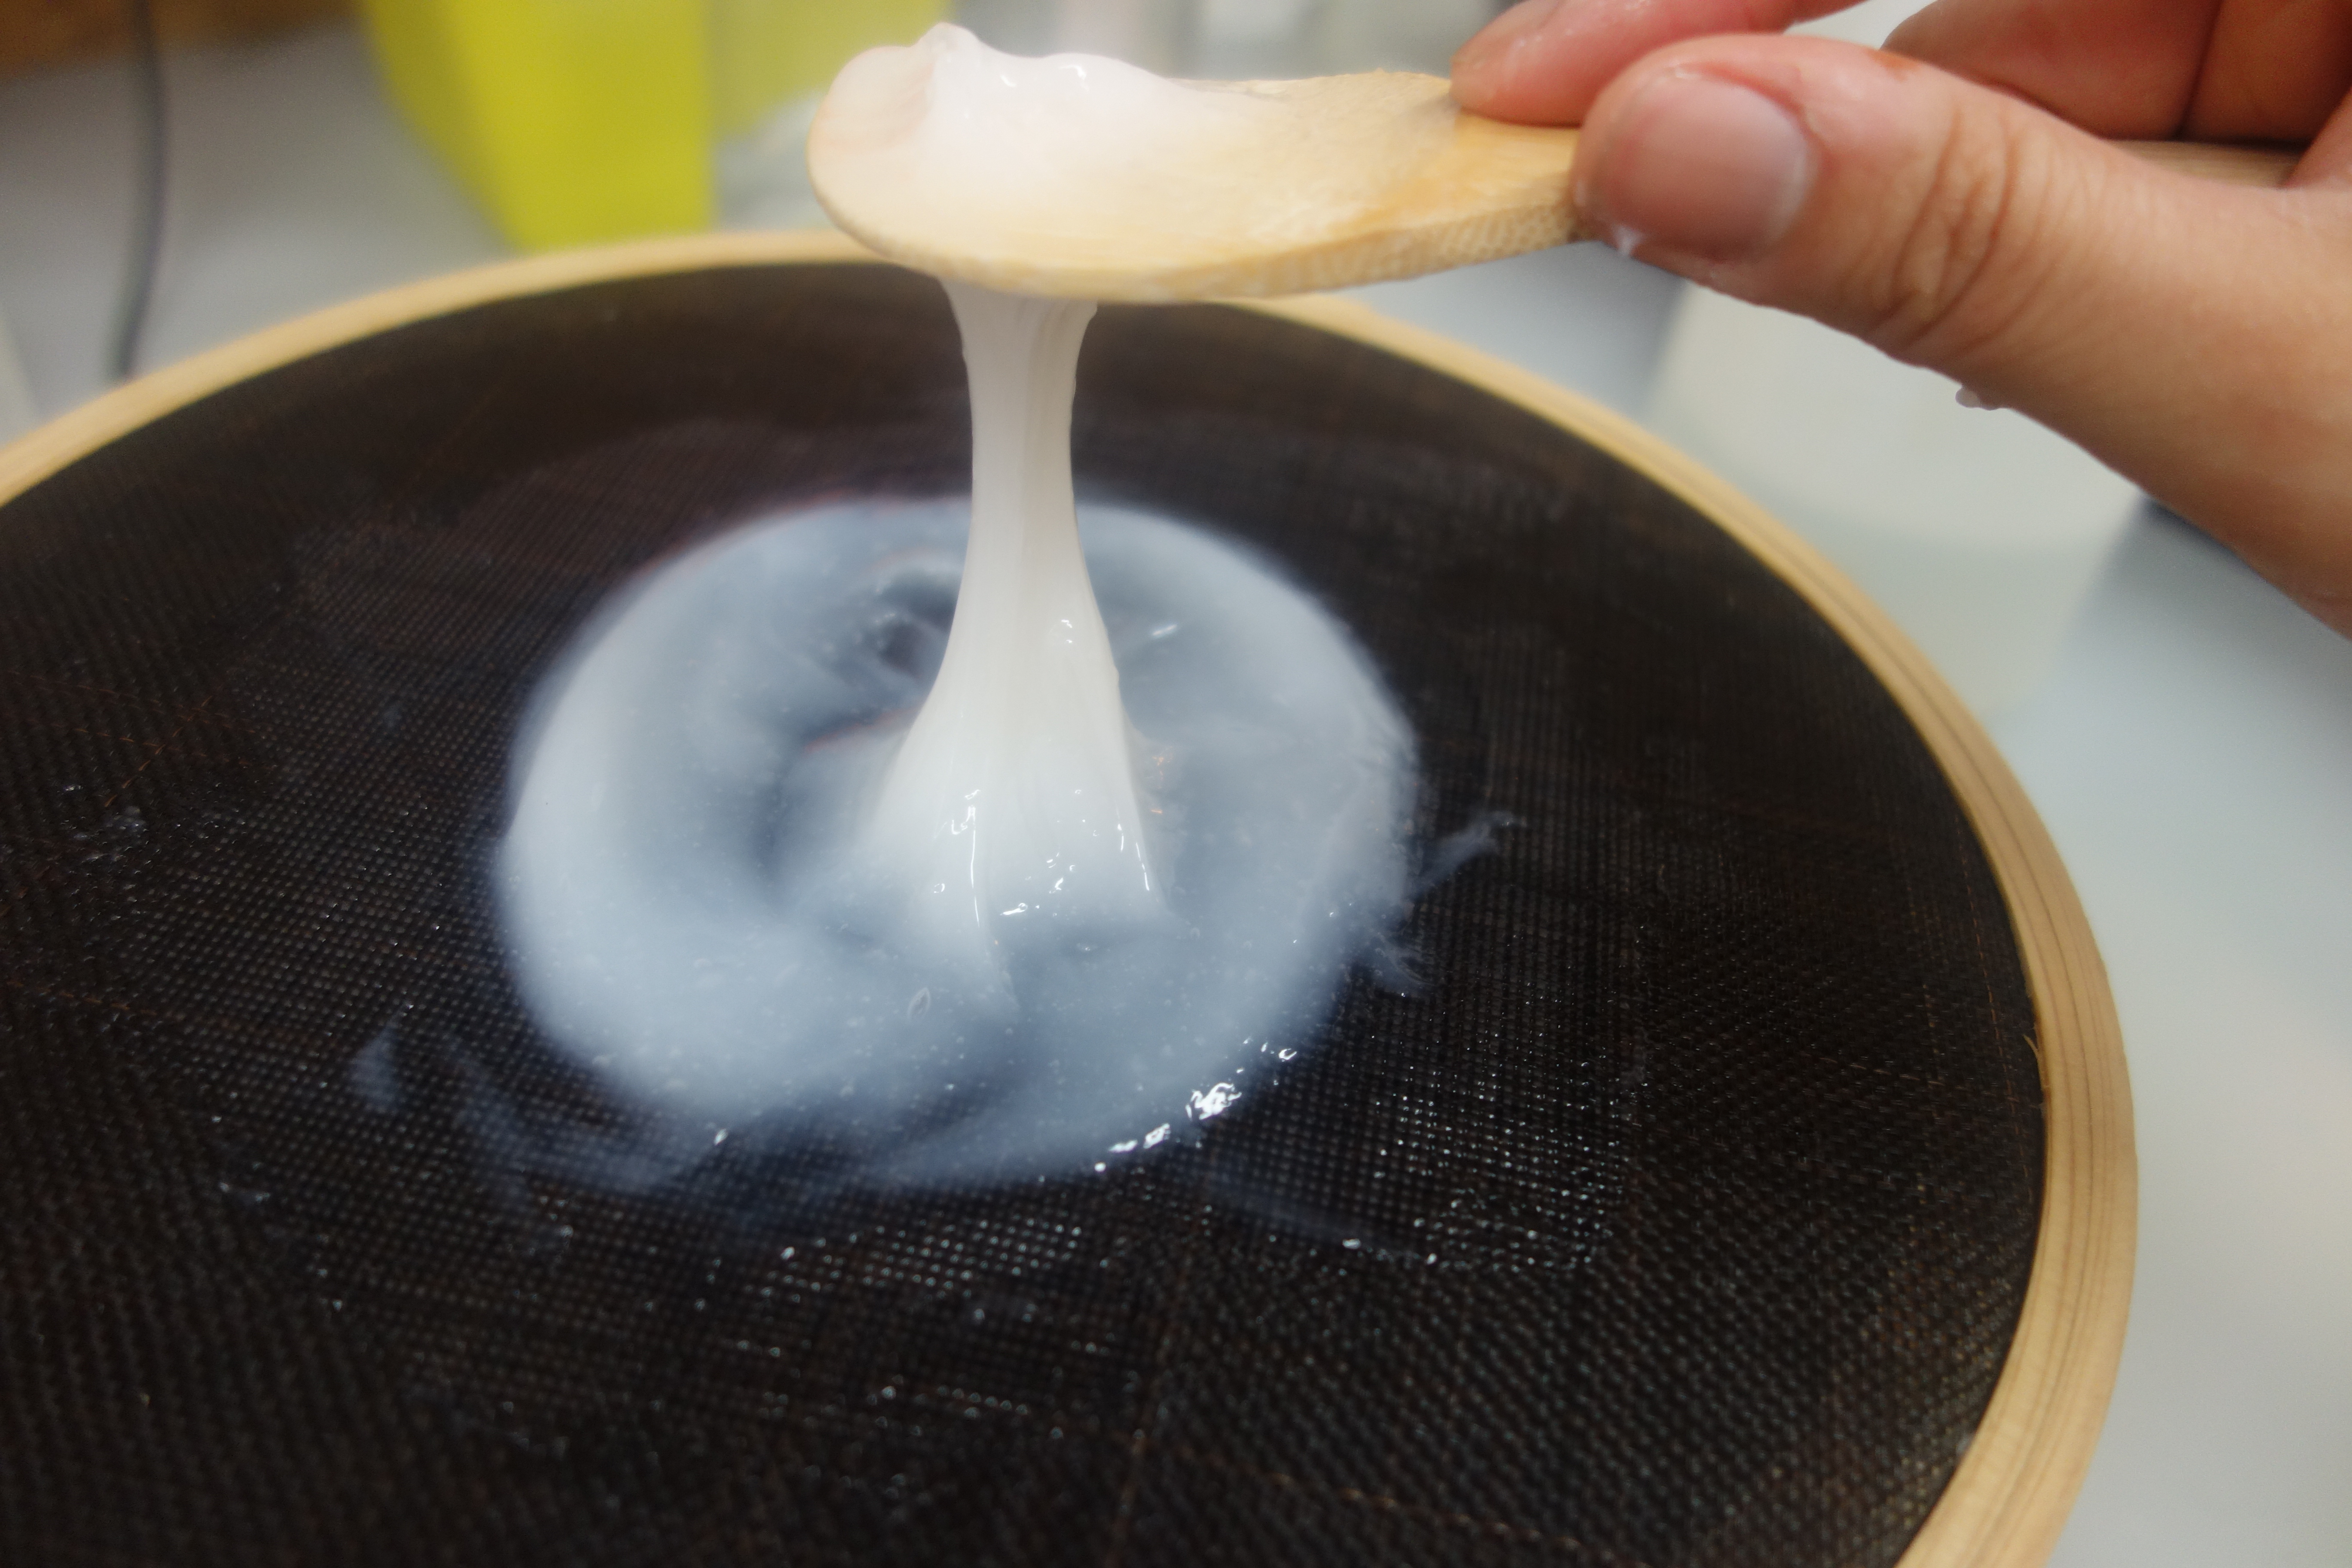
Fig.8 Paste after kneading and sieving twice
4) Large-batch recipe
This recipe was kindly provided by Ms. Kyoko Kusunoki, conservator at the Hirayama Studio of the British Museum. It is a recipe the studio uses to make batches of 1 kg or more of paste. Ms. Kusunoki said they use Komugi denpun tokutoo NS-grade wheat starch sourced from Japan.
A proportion of 270 g of starch paste to 1230 g (or cc) of de-ionized water is used for an initial batch weight of 1500 g.
Unlike I do in my small-batch method, the Hirayama studio does not pre-soak the starch. They have experimented and found that while the cooking process is slightly different, pre-soaking does not make any significant difference to the quality of the end product.
The water/starch mixture is first stirred by hand in the cooking pot until homogeneous, and then put on a medium heat on the gas range or electric heating plate.
The cooking phase is similar to that of the small-batch recipe, maybe marginally longer.
One key difference is that non-pre-soaked starch will tend to form lumps more readily and needs to be watched and stirred very thoroughly in the initial stages of cooking to avoid their development. Another key difference is the substantial physical effort required to vigorously stir the large-batch mixture for 20-25 minutes non-stop! Ms. Kusunoki advised that if the cooking time is too short, the starch will not properly gelatinize. Even though the paste initially looks like proper paste, it will separate into water and starch layers after a few days. As mentioned before, a good test to verify the well-cooked paste is to check whether it can make a thread.
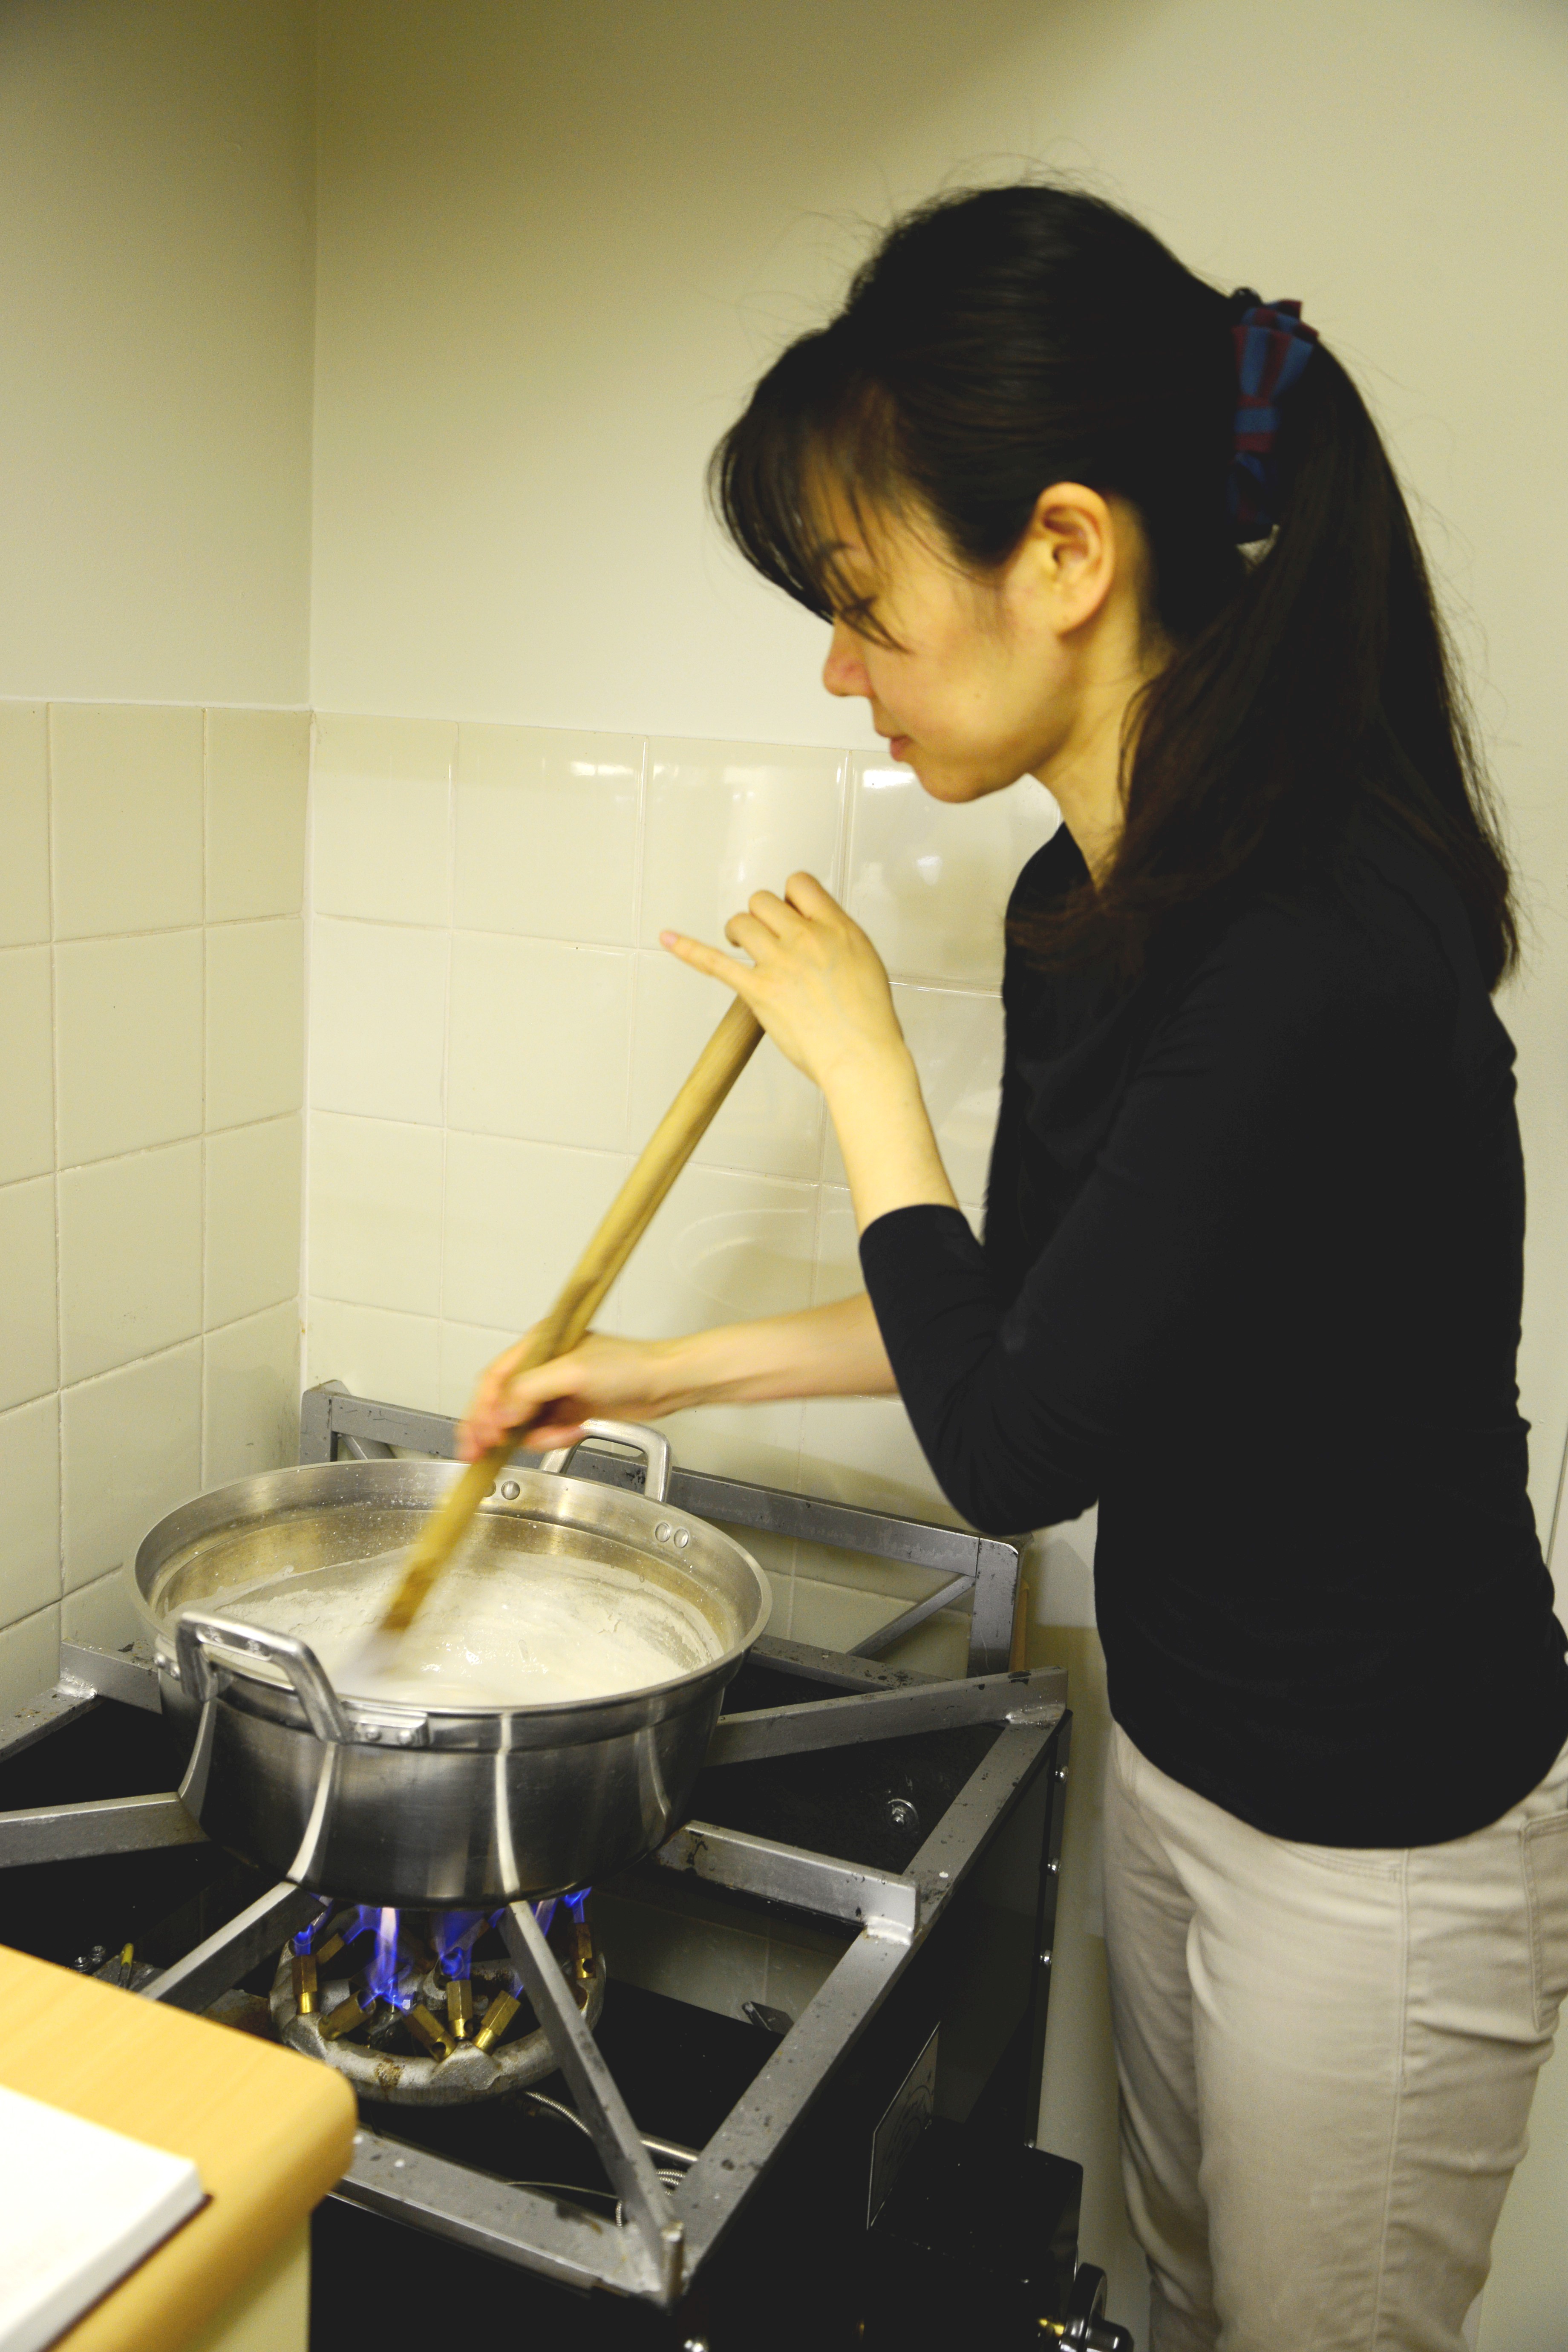
Fig.9 Kyoko Kusunoki cooking paste
The cooling and sieving phases are generally identical to the small-batch recipe.
Note that the Hirayama Studio uses different proportions and cooking times depending on the batch size. Also note that the source and quality of the starch influences cooking times.
| Starch Qty (g) | Water (g/cc) | Batch Size (g) |
Cooking Time |
| 270 | 1230 | 1500 | ~25 |
| 360 | 2460 | 2000 | ~30 |
| 540 | 2460 | 3000 | ~35 |
| 720 | 3280 | 4000 | ~45 |
5) Paste storage and use
Once sieved, the paste should be transferred to a clean jar that should then be kept closed (with a lid or cling-film wrap) between uses and labeled with the date of manufacture.
The optimal storage temperature is cool, 10-15 °C/50-60 °F, which will allow the paste to keep for well over a week.
According to Ms.Kusunoki, storing paste in a refrigerated environment (below 6 °C/45 °F) is not recommended, as the cold temperature deteriorates its homogeneity and adhesive properties.
She also advised that, for large batches, if a film of mould appears on recently made paste, the mould can simply be removed and the remaining paste transferred to a clean jar. However, any paste that shows significant changes of colour or texture, or has an unpleasant smell, should be discarded.
Properly labelling batches of paste with their date of manufacture is also very important. There is no “hard-set” rule, and the shelf-life of a paste batch can vary significantly according to environmental and storage conditions. Conservators should use their best judgement, but I personally would not use a paste batch older than seven days.
As far as use, paste can be diluted as required to adapt it to the materials to be adhered.
Please enjoy trying recipes, and let me know the result or any challenges you have met!
*ed. note: the original post listed the heating plate temperature for the small-batch recipe as 150-180 °C/300-350 °F. This has been corrected to 300-350 °C/570-660 °F.
Mito Matsumaru has a BA in Art History and an MA in Conservation Science from the Tokyo University of the Arts. She fell in love with book and paper conservation during a year as an exchange student at the Camberwell College of Arts in 2013. She is now back in the UK to gain an MA in Conservation of Books & Library Materials at West Dean College. She is the proud recipient of the 2016 Nick Johnson Prize in book conservation. m.mito3@gmail.com

Great instructions and pictures, thanks!
LikeLike
My pleasure, Katherine. I am very glad that you liked it!
LikeLike
Very useful to have it written down like this.
Excellent, thank you.
LikeLike
I am very glad to hear that, thank you. Local conditions (heat/humidity) may affect the recipe. Enjoy paste making!
LikeLike
I personally have good experience and excellent results using the so called “Saucier” (mine is from Tefal). Basically this is a cooking pan designed to cook sauces etc. It stirs the content of the pan constantly while the temperature can be set in 5 steps from moderately warm to cooking.
Making paste is very easy.
First I put 100 grams (more or less depending on the kind of starch) wheat starch in the Saucier, I then add half a liter of cold water to it. I set the temperature at the highest level. After 5-7 minutes the paste starts start cooking and I let it cook for 25 minutes.
Then I poor the boiling fluid (which it still is at that time) into a plastic jar and let it cool down (this takes a long time).
After this I mix the paste for 5 minutes using a kitchenmixer. After that the paste is ready.
So no stirring (this is done by the Saucier) and no sieving. I did this in the past but it is a lot of work and sometimes heavy to do. The mixing results in a very smooth and homogeneous and very well sticking paste with no lumps at all. The advantage of the Saucier is that you can do other things while the paste is cooking.
I usually put have of the batch in a tupperware container in the fridge. It keeps for a week. When taken out of the fridge it should be “well beaten up with a flat stick” so says Douglas Cockerell in his work ‘Bookbinding: The Classic Arts and Crafts Manual’.
LikeLike
Dear Cor,
Thank you very much for your comment and detailed recipe.
I’ll definitely will try it – I have tried Saucier before but with shorter cooking time, and it never crossed my mind to use a mixer post-cooking! Many thanks for pointing out Douglas Cockerell’s work too.
LikeLike
Dear Mito,
A good paste is a joy for sure! The mixing thing is quite miraculous. The material state of the paste changes dramatically during the mixing process. Initially the just cooked and cooled paste is somewhat sturdy but when mixing you can notice the paste gets smooth, gelly, shinier, and it even seems to condense a little in mass.
LikeLiked by 1 person
This is the first time I have read thebookandpapergathering. Amazing information! Thank you, thank you.
LikeLiked by 1 person
Ginny, we’re so pleased you like our site. We’ve got many more exciting and informative articles in the works for 2017, so hopefully you’ve subscribed to us – and be sure to have your colleagues do the same!
LikeLike
Thankyou so much for sharing these detailed instructions. Brilliant post.
LikeLiked by 1 person
I am very glad that you found this useful! I keep trying new recipes to see how they impact quality. Thank you very much!
LikeLike
Hello, could I use corn starch?
I can not find the wheat starch in my country …
sorry for ignorance
LikeLiked by 1 person
Hello Paulo, in my experience corn starch tends to be a little yellowish, compared to wheat or rice starch. But the glue aspects are fine.
LikeLiked by 1 person
Thankyou for a really good tutorial . This is all new to me and I have learnt a lot from this. Bridie
LikeLiked by 1 person
Thank you for your comment!
LikeLike
Thank you for your comment, Bridie. I am glad you liked it!
LikeLike