Elizabeth Twining (1805–1889) was a botanist and a botanic artist whose book Illustrations of the Natural Orders of Plants with Groups and Descriptions was printed in London in 1849 in folio. It is thought to rank among the finest lithographic flower books of the mid-nineteenth century.
Senate House Library, the central library of the University of London, holds the quarto edition of 1868. The two-volume set contains 160 colour plates on thick paper bound using caoutchouc, a latex adhesive sometimes known as gutta percha. This adhesive-only binding was pasted into a quarter goat case.

The method of using caoutchouc to glue books was devised by William Hancock, brother to Thomas, the founder of the india-rubber trade in England. William was granted a patent in 1836, to the consternation of bookbinders. The single sheets of the text block and illustrations were held together with layers of a rubber solution from the latex of tropical plants. The spine edge of the book’s leaves were roughened and layers of rubber solution laid down before a final layer of rubber was applied impregnated into a cloth lining. Bernard Middleton in The History of English Craft Bookbinding Technique (1963), and Don Etherington describe the method.
The caoutchouc binding was popular for illustrated “table books” of the 1860s and often used on books printed on very thick paper. It enabled the single leaves of printed plates to open easily. However, over time the caoutchouc became brittle and this, with the stiffness of the thick paper, has seen most caoutchouc glued books fall apart. This has happened to both of these volumes. Every time a reader opened these, no matter how carefully, the pages became detached. Yet the quarter goat case was intact, with only minor damage to the head caps at the joints.
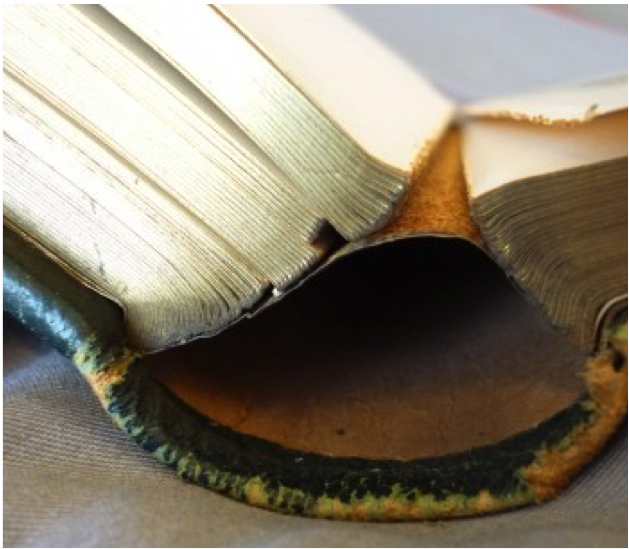
The failed caoutchouc glue on the spine
Conservation
As conservators we aim to preserve the evidence of a book’s history with as little interference as possible, whilst making it accessible to historians and readers. For a book with many loose leaves that cannot be put back together without a great deal of intervention, the best approach would be to box it with its cover and ensure it is handled carefully. This would show the original caoutchouc structure. This book, although beautifully illustrated, is not a first edition, so we decided to look into returning it to its bound state to protect the leaves during use. We wanted to retain the single-leaf binding style but avoid the binding failing again. Bernard Middleton, in The Restoration of Leather Bindings, suggests fanning the spine to apply a sliver of adhesive between each leaf and, if necessary, sawing a groove across the spine into the back of each section to lay a cord in. However, this may need a strong but irreversible glue and we would not cut original leaves. We looked at turning each leaf into a section by pasting the leaves together and sewing the book as a normal binding, but this does not reflect the original style and the thread would make it too thick to be returned to its covers without cutting the leather of the case.
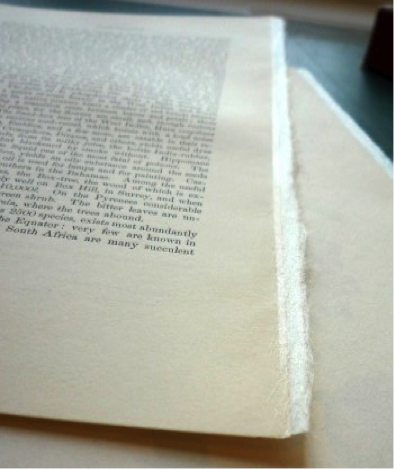
A conservator in America, Susanna Donovan, introduced us to Gary Frost’s unpublished method. He pasted strips of thin Japanese paper to each leaf, extending a feather-cut edge of paper beyond the spine edge.

Japanese paper guard tipped to a single leaf (not to scale)
The feathered edges were then glued to the spine, joining the leaves back into a volume and allowing the book to be returned to its original cover. This retains the single leaves and enables the book to be returned to its binding. Our next step then was to select a strong, reversible adhesive with sufficient flexibility and do a partial mock up.

Guard pasted to spine edge of leaf
We found that our most commonly used paste, gluten-free wheat starch, was effective.

Guard pasted across two adjoining leaves (paste not illustrated)
The first step was to remove the old caoutchouc glue from each leaf. Alex Bruce, the conservator, found that it came away readily and that the edge was indeed slightly roughened. Care was taken to retain the crease from the original rounding and backing in each leaf.

Although brittle and friable, the residue still needed to be carefully scraped off

The spine is shown above with most of the caoutchouc removed
Narrow Japanese paper guards were pasted onto each leaf, projecting a few millimetres beyond the page. They were cut slightly short of the head and tail so that they did not show on the gilt edge.
Paper guard with feather-cut edge
The single leaves were gathered together and, surprisingly, there was little increase in swell. Care had to be taken to ensure the leaves lined up with each other, retaining the original text block shape and the curve of the spine. Fine adjustments were made to ensure it would fit exactly into its case and line up with the original squares. Once the text block was in the press, further measurements were taken to ensure it was the correct depth, especially across the joint, and again adjustments were made. The guard extensions were then pasted individually, each one overlapping the earlier one to ensure adhesion across the spine edge of each leaf before rubbing well down on the spine.
-

- Pasting each guard down
-

- Close-up of guards
-

- Rubbing down each guard

Pared and toned leather head cap repair

Repaired head cap
Once the text block was re-assembled and dry, Alex put the book into the case to confirm the fit.

Checking the book will fit in the case again
The spine was then lined with a thin, strong linen, wider than the spine. The linen extensions were pasted onto the boards under the lifted end leaves to re-attach the text block to the case binding. Finally, strips of paper, toned to match the endleaves, were pasted over the cloth joint. We are confident this adhesive “binding” will last longer than the caoutchouc.

Pasting the cloth spine lining onto the board

Brittle spine adhesive before conservation

Spine after conservation
The original caoutchouc-covered textile spine lining was retained and stored with the conserved books.

The two volumes after conservation, showing the repaired end leaf joint and the bookplate commemorating John Grigg, in whose memory the book was conserved through the Senate House Library Friends’ BeFriend a Book scheme
Alex Bruce trained at the London College of Printing (now The University of the Arts) before working freelance for a number of private collectors and libraries as a book conservator. Alex has worked at Senate House Library since 1998 as a conservator in Special Collections.
Angela Craft studied bookbinding and restoration at Camberwell College in 1980 before working at the National Archives, initially as an archive conservator and later as a book conservator. After a mid-career internship with Chris Clarkson at West Dean College, she studied for an MA in the History of the Book at the University of London. She is currently Senior Conservator at Senate House Library, University of London.

Thanks for sharing Angela and Alex, can you please let us know how long this project took to complete?
LikeLike
This is a wonderful technique you have explained to us all! It will solve many single sheet binding problems, particularly when the paper is thick. We have been holding a 200 year old book in our workshop for 25 years, having initially disbound it into its single leaves, and then washing, bleaching and deacidifying every leaf. (It came to us so very thoroughly foxed, that the engravings were almost entirely obliterated.). We have been waiting to be inspired by a suitable technique to bind it back together. The technique you have described is exactly what we have been waiting for. Thank you so much. Just one question: What is the weight of the Japanese paper you used?
LikeLike
Approximately 40 hours for one volume,( including writing up a full conservation record.)
LikeLike
Pleased you liked it. The Japanese handmade paper K-36, Minogami Usukuchi – 640 x980mm – 25gsm used was bought from Conservation by Design 2011 [PAJAPK0036]
LikeLike
Thanks It’s very interesting, but I cannot figure out why the swelling was less than with a normal guarding technique, you still have one thickness of japanese paper every sheet as happens with guarding, I understand that you do not have the swelling of the thread but I need to try it to figure it out. I will very soon !
LikeLike
We were suprised too, but the swelling was less than with a normal guarding technique because there was no sewing – so no fold of paper to trap air or as you mentioned, sewing thread.
LikeLike
Thank you, Alex and Angela, for making known this interesting (re)binding solution.
In response to Alessandro’s agony, from my point of view, each strip of Japanese paper comes to fill the gap that the fanning produced by the backing of the spine has created between the loose leaves. This is the reason why not only the swell does not increase, but also the effect of the backing is naturally maintained. Thus, the choice of the Jap paper to be used needs to be taken in accordance with the physical characteristics of every particular book, chiefly the type of paper the book block is made of and the form of the spine if, as in this case, it needs to be preserved.
LikeLike
This is an excellent technique to solve a problem, us book conservators have been struggling with for many years. Thank you Alex and Angela for sharing your wonderful results. 🙂
Cannot wait to try the technique out myself.
LikeLike
Hello Alex and Angela,
Thank you for sharing this wonderful information. I recently used this method to put back together The Holy Land by David Robers, R.A., published by Cassell, Petter, Galphin & Co. Just as I am about to put the book back into its case, the book started to split again at various point where the Japanese tissue has lifted off. This happened at the 1/3 part of the book, and it has now split again at the half point. I am cracking to head to find out what I did wrong that caused this. The book was propped up with a rolled towel when I opened it, days after it was let to dry.
LikeLike
After we tried this technique on a book of engravings published in 1828, the book also came apart. We were most careful with the placement of the Japanese Paper, but it pulled away from the spine area at several points in the binding, in clumps. We had to revert to an advanced perfect binding technique to bind the book together. At first reading of the method outlined above, it looked promising, but in practice, it didn’t work. Adelene, you are not alone in the technique’s failure. There appears to be some strenuous forces at work in the spine area, which the Japanese paper is not strong enough to overcome.
LikeLike
Roger, this is really comforting to know that I am not the only one having this problem. I was so worried and almost to tears when it failed because I have already spent many hours working on the book. I started to take out the clumps, and added longer strips of Japanese paper, so that it overlaps the clump to hold it in place. I think it could also be due to the weight of the paper and size of the book that caused it to fail. I am trying to overcome this without having to take it apart because most of the book still works. I will cross my fingers once the entire book is put together again to see if it will work before taking the next step.
LikeLike
Adelene. We also spent many many hours preparing and working this technique, using a 45gsm Kozo. It was also quite disappointing when the failing revealed itself. We observed that the Japanese Paper was cleaving, ie splitting, and the nature of Japanese Paper (that is, its ability to split), we thought, precluded the binding problem being solved. We tried fixing it by gluing the split areas, but each time the book was opened, the problem simply appeared elsewhere in the binding. So, we gave up and turned to our alternative binding method. We thought that the problem might have been the reason why the method had not been published initially by Gary Frost. So, good luck in your endeavours to fix the problem. Do post your result.
LikeLike
Hello Adelene
I think the problem you have encountered has occurred during the process of the adhesion of the guard extensions over the spine. It is really important during this process that each guard extension is pasted individually, each one overlapping the earlier one and worked well with a bone folder. This was very time consuming, partly because of the number of guard extensions and also they caught together because of the fibres (I used a long upholstery needle to separate each guard extension prior to adhering across the spine and then rubbing down well before doing the next one). Also pay particular attention to the application of the paste. Then leave in the press to dry before removing.
As you mentioned, parts of the book are functioning well.
Your comment below mentioned ‘clumps’ – there should be no clumps – the spine should end up smooth.
All the best.
Alexandra
LikeLike
Hello Roger
Please see my reply to Adelene.
Best regards
Alexandra
LikeLike
Hello John, let me know how you get on when you do try it. See comments below – (some are having problems with it).
Best regards
Alexandra
LikeLike
Hi Adelene – ignore my comment re- clumps (I misinterpreted your meaning)
Best regards
Alexandra
LikeLike
Hello Alexandra, thank you for taking time to clarify this. Yes, I applied the paste layer by layer using a small flat brush and a teflon folder, separating each layer with a sewing needle. It is a good technique regardless, but I think it is restricted to a maximum size of the book. Mine is a 310 x 240 x 45mm book with heavy papers, therefore I think this was not suitable for it. However, with that said, I can confirm that it is a very reversible technique with almost zero damage to the book.
LikeLike
I also had the problem of breaks that others have reported. One contributing factor in mine is that plates are wrong grain, so are very stiff and do not flex when the book is opened and pages are turned. I used wheat starch paste for pasting down the Japanese paper guards and a barrier lining of Japanese paper, but used PVA/MC mix to adhere a linen spine lining over that. I think that may conribute to the failure (the stronger bond of the PVA/MC). What adhesives did others use for spine linings?
LikeLike
Hi Elise.
We are disappointed to hear this technique has not worked for you for this book
As all bindings and types of damage are different it may be that there were elements of the book and its binding that prevented it from working.
Both our volumes had roughened edges on the leaves (from the previous caoutchouc method.) so maybe the Japanese paper guards stuck more firmly across the spine edges. Perhaps the leaves on your item were clean cut? We also used a thin, 25gsm paper and a pre-washed unbleached aero linen pasted to the spine (with flanges to re-case into original cover), using wheat starch paste.
We overlapped the Japanese guards just enough to cover the next few leaves, as anything more resulted in a thick build-up of Japanese paper causing an inflexible spine. Could this be why yours broke away in ‘clumps’?.
We only used wheat starch paste for all stages – make sure you have a good consistency and a good tack is essential and spend a lot of time rubbing down each guard.
Hope you get a chance to give this technique another go – it has worked for us.
All the best
Alex and Angela
LikeLike
Hi Alex and Angela,
Thank you for your thoughts on possible causes of the problem! I think several things contributed, including using a stronger adhesive to adhere the spine lining, guards too long causing a thick build up on the spine, and plates with the grain perpendicular to the spine.
Elise
LikeLike
Sorry, I’m a bit late to the party here. I have two caoutchouc bound volumes, size 467mm x 343 x 40mm, one of which has previously been mended using oversewing, the other not. In both cases pages are loose or partly detached. Some pages are still intact with the original caoutchouc. I’m very intrigued by your method, in particular because the previous oversewing method hasn’t worked and the pages are very stiff to turn. Can I just ask how long your guards were? Covering how many leaves max?
LikeLike